ABM Materials
What Are Materials?
In Arryved Brewery Management (ABM), there are three types of Items: Materials, Finished Goods or Other. Materials are the type of Items you use in Production. They are purchased from your Suppliers and become part of your Inventory. Materials are generally ingredients, supplies, and packaging. Use this guide to learn how to add Materials in the Items section of your ABM.
Prerequisites
To add or edit Materials, you must be an ABM User with either the Admin, Sales, Inventory, or Production User Role. The Delivery User Role grants view-only access to Items.
It’s recommended to add the Suppliers you purchase Materials from in your ABM first, so you can assign the Supplier to the Item. But, you can always add them in later.
Limitations
Material types are predefined in your ABM, you can’t add custom types. But there is a ‘Misc.’ type you can use.
How It Works
Recommended Starting Point
Here’s how it goes: Items have Sizes and sizes have Item Parts.
So a Material Item that’s a ‘2-row malt’ for example, can come in various Sizes such as a 5lb bag, 10lb bag, etc.
Then, each of those Sizes can have Item Parts. For example, a 10lb bag can have the malt and the canvas sack as Item Parts.
Each Item Part is an Item itself.
When adding Materials to your ABM, we recommend starting with Item Parts first, so those can be added to the larger Item Sizes you create thereafter.
Adding A New Item
From the left side navigation, click Items.
Click New Item.
General Info
Stay under the GENERAL tab for the new Item.
Enter the name of this Material in the Name field.
Under Class, select ‘Materials’.
Under Type, select one of the options that best describes this Item.
Tags can be applied to help you filter Items in your reporting. Tags are optional and can be added later if you haven’t created any yet.
Select the Supplier that this Item comes from. If it’s an Item that you produce, select your company as the Supplier. It should be on the list from your ABM onboarding.
If you haven’t added this Supplier to the Company section of your ABM yet, you can come back to this later.
Select a Production Unit to use in Batch planning and Inventory counting.
Click Save in the upper right corner before adding Sizes in the next section.
Adding Sizes
Add all the possible sizes of this Material to the Sizes section.
Under the Sizes section of the new Item, click Add Size.
Enter an Item Size Name.
Enter a Wholesale Price only if you plan to resell this Item.
Check the Wholesale box if you want to resell this Item, This makes it available to add to Invoices.
Enter a Default Cost. This is the cost that you would purchase this Item for from the Supplier.
This cost appears on Purchase Orders and Inventory Adjustments but can be overridden at the time of use.
Enter a SKU for an optional identifier for this Item.
Enter the UPC. There’s a built-in validation to make sure the UPC code is ina valid format.
Check the Not Inventoried box if you don't want to track this Item in your Inventory. Your ABM will assume that you have an infinite supply of it and automatically generate new units when necessary.
Check the Allow fractional units box to interact with the Item in fractions of a unit down to 0.001. This may be useful for instances when you might need to process a partial return or unpackaged items like Brite beer where you'll frequently be working with quantities that aren't divisible by whole barrels.
Enter Units of Measurement for Weight and Volume.
These measurements are used to calculate cost when converting to production units.
They are also used to calculate the allocates of charges to multiple Items such as shipping fees.
Reorder Point
Reorder Point is a tool that allows you to set safety net parameters to help make sure you don't run out of a Material before it's too late. Your ABM will warn you when your Inventory falls below your safety net. Then, you'll know it's time to reorder this Material.
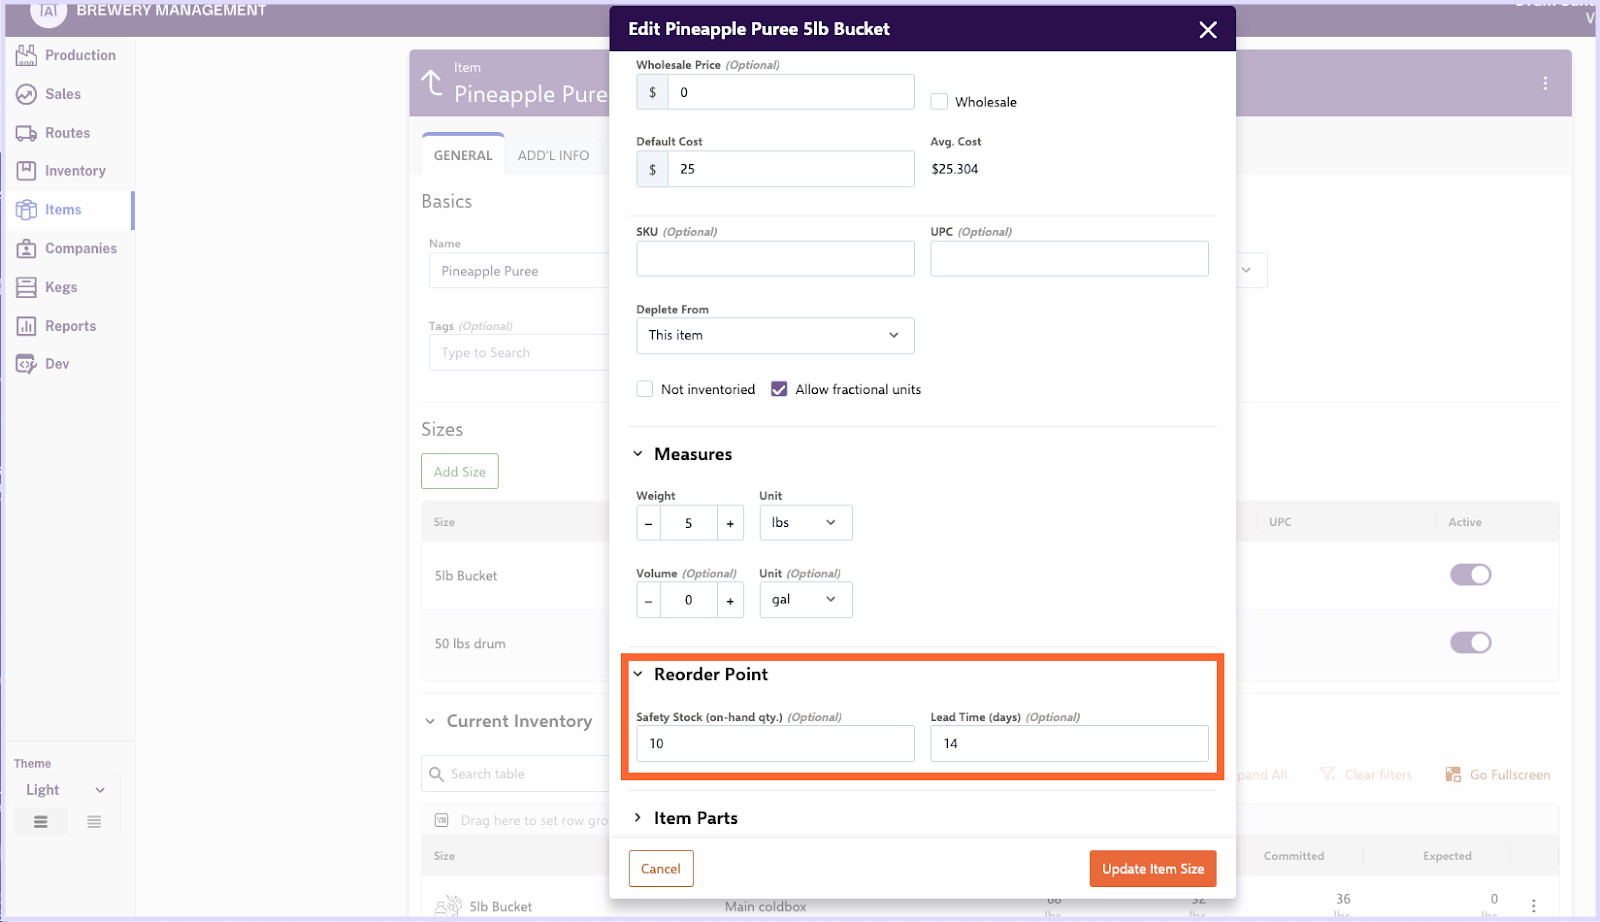
Safety Stock is your first Reorder Point tool. Enter a buffer count as a safety net in case of an unusual spike in consumption of that item. If a “10” is entered, then ABM will provide a warning that it may be time to reorder this Item when the On Hand Inventory count reaches 10 or below.

Lead Time allows you to enter the time (in days) it takes to receive this item after a Purchase Order is sent. The lead time will be taken into account and ABM will warn you when there isn’t enough inventory to cover the Rate of Use plus the Lead Time. Here’s how it’s calculated:
- Inventory On-Hand / Rate of Use = On-Hand Coverage.
- If the On-Hand Coverage is less than the Lead Time, you’ll receive a warning.
- If you also have a Safety Stock entered, ABM will take both into account when providing you with a warning.
Item Parts
Item Parts allow you to get even more granular with your Item Sizes. They allow you to specify all the individual components of an Item. Item Parts are most commonly used with Finished Goods, but you’re free to add Item Parts to Materials if needed. Maybe you want to return, resell, or reuse the canvas sacks that come with a bag of malts. You can add the sack and the loose malt as separate Item Parts.
Remember the Item Parts must be created as their own Items first before they can be applied as Item Parts.
Click the dropdown arrow next to Item Parts to expand the section.
Click Add item part.
Search for the Item Part from your full list of Items.
Enter a Quantity to scale properly. For example, a case should have 24 16-oz cans.
Select a Unit of measurement.
Add as many Item Parts as you need, then click Update Item Size when ready.
Next
Related Articles
ABM <> POS Sync Overview
What Is The ABM + POS Sync? Your Arryved POS Sales and Inventory data can now be synced with Arryved Brewery Management (ABM) for seamless tracking, reporting, and inventory management! This guide walks you through how the ABM + POS Sync works. ...ABM + QBO Sync
What Is The ABM + QBO Sync? Your Arryved Brewery Management (ABM) can be synced with your QuickBooks Online (QBO) account to help automate the bookkeeping and accounting of your brewing operations. Actions from your ABM will automatically update ...ABM <> POS Sync Cheat Sheet
What Is The ABM + POS Sync? Your Arryved POS Sales and Inventory data can now be synced with Arryved Brewery Management (ABM) for seamless tracking, reporting, and inventory management! You’ll use both your ABM and Arryved Portal to manage Inventory ...ABM & QBO Self-Service
Overview Welcome to QBO Self-Service! This is a feature that we’ve democratized to users to speed up the QBO x ABM onboarding process and put account mapping changes in the hands of those who know their accounts best! We’ve already written a handy ...ABM Inventory
What Is Inventory? In Arryved Brewery Management (ABM), Inventory refers to the status of the Items you currently have to sell to Customers or use in Production. Use this guide for a deep dive into how Inventory works in your ABM. Prerequisites To ...