SKU & Barcode Setup Guide
What Is A SKU?
A SKU or Stock Keeping Unit is a unique string of numbers used to identify your unique Inventory Items. Use a barcode scanner to read the SKU and recognize the item for quick ordering in Arryved Service.
What Is A Barcode?
A barcode is a unique visual pattern that’s readable through a barcode scanner. A unique barcode has a unique SKU assigned to it. Scanning the barcode reads its SKU, and recognizes the Inventory Item that the SKU belongs to.
Prerequisites
Reach out to the friendly voices at Arryved Support to enable SKUs for your location. You can also browse the hardware catalog for an Arryved-supported barcode scanner.
To enters SKUs in your Arryved Portal, you must be a Portal Super Admin or an Admin with one of the following Permissions
INVENTORY
ALL ACCESS
FULL ADMIN
ARRYVED VIEW
Limitations
Each Inventory Item must have its own unique SKU. Different Unit Sizes from the same Inventory Item can share a SKU.
SKUs can only consist of numbers. The barcode scanner won’t recognize letters.
If you’re cloning Inventory Items, the SKUs will clone too. Don’t forget to change the SKU on a new Inventory Item that was cloned.
Barcodes must be printed or on physical merchandise. They can’t be scanned from a screen.
If you’re using SKUs from existing barcodes, you need to enter them in Arryved Portal exactly as they’re shown.
The barcode scanner won't scan items in a Venue that has "Single Listing Menu" enabled under Venue Configuration.
How It Works
Barcodes
Existing Barcodes
If you’re using barcodes that already exist on your inventory such as on clothing tags or cans and bottles, your Arryved barcode scanner can read them.
Use the same SKU seen on the existing barcodes and enter them into your Arryved Portal in the next step.
Be sure they match exactly including the outlying numbers on each end of the barcode.
A unique SKU for an Inventory Item must match its unique barcode.
Create Your Own
If you need to create barcodes for your inventory, you can make up your own SKUs and create barcodes using Barcodesinc.com or another service you’re familiar with. SKUs should be between 8-13 numbers.
SKUs
Any Inventory Item you want to be scannable with the barcode scanner needs to have a SKU. An item’s different Unit Sizes can have their own unique SKUs or you can use the same SKUs for one item’s different sizes. Whatever makes the most sense to you.
Head to your Arryved Portal.
From the left side navigation, click Inventory.
Click Inventory Folders. Choose a Folder.
Click on an Inventory Item from that Folder.
Scroll down and expand the Costs section.
Enter your unique SKUs in the SKU field next to each Unit Size.
If you don’t see the SKU field, reach out to Arryved Support to enable it for you.
Manual Entry
You can hand type each SKU into the SKU fields.
They must match what’s on their corresponding barcodes exactly. Spaces do not matter, but only numbers are acceptable.
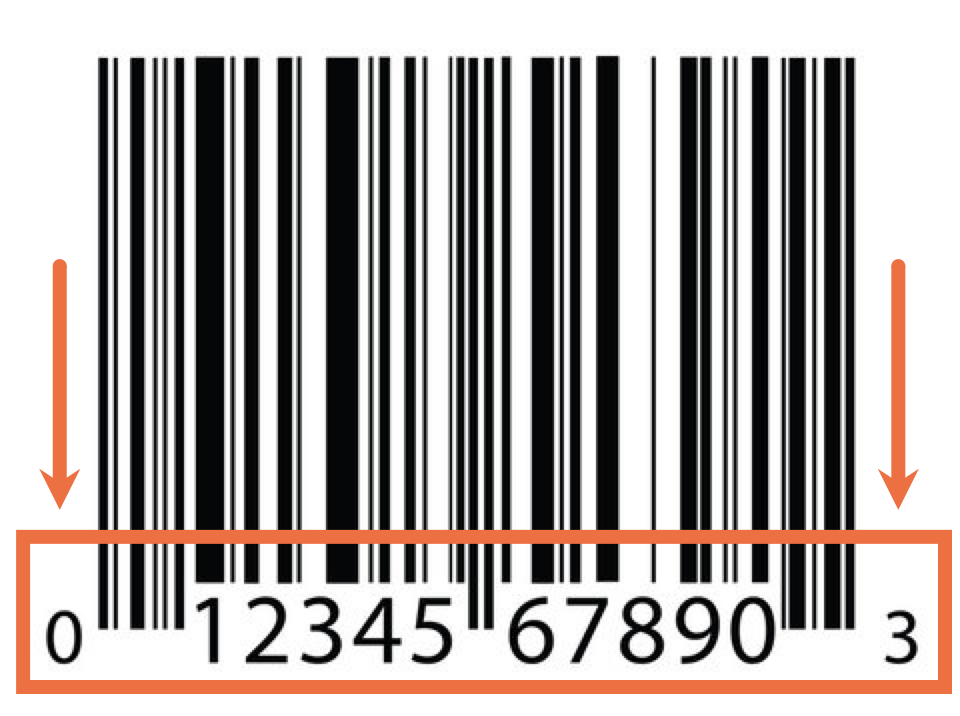
If using existing barcode SKUs, be sure to include the outer numbers on each end of the barcode.
In the example below, the SKU is 012345678903.
Scan Entry
If you already have your barcode scanner handy, you can scan your barcodes right into the SKU field in your Arryved Portal. From your Arryved Portal, click into the SKU field next to the Inventory Item’s Unit Sizes.
Using the USB cable, plug your barcode scanner into your computer.
You may need an adapter if you’re using a newer MacBook that doesn’t have a USB port.
Use the barcode scanner to scan the corresponding barcode for the item.
Barcodes must be printed or on physical merchandise. They can’t be scanned from a screen.
You’ll see the SKU appear in the field as soon as you scan the barcode. When doing it this way, each SKU likely ends with a pound sign (#). You must delete the pound sign each time.
If you don’t see the pound sign appear, don’t worry about it!
Click into the next SKU field and scan the next barcode. Repeat this process for all of your SKUs.
Whether you manually entered the SKUs or scanned them in, click Save from the Inventory Item page when finished.
Next
Now that your SKUs and barcodes are set up, let’s get your barcode scanner configured to your Arryved Portal.
Related Articles
Inateck Barcode Scanner Setup Guide
What Is The Inateck Barcode Scanner? The Inateck barcode scanner is your solution to scanning merchandise for quick sale. The scanner is compatible with Arryved Service and your Inventory Items. Enter unique SKUs in your Arryved Portal for any ...Arryved Service Preferences
What Are Arryved Service Preferences? Location Preferences, available in your Arryved Portal, allow you to customize the Arryved Product suite, per location, to meet your business needs. The Preferences are broken into sections. The ‘Arryved Service’ ...Arryved Cloud Preferences
What Are Arryved Cloud Preferences? Location Preferences, available in your Arryved Portal, allow you to customize the Arryved Product suite, per location, to meet your business needs. The Preferences are broken into sections. The ‘Arryved Cloud’ ...Epson Printer Setup Guide (Ethernet)
Epson Printer Setup With Ethernet Have a brand new Epson printer you need to set up? Or are you trying to re-configuring your existing Epson printer? This article shows you how to configure your Epson printer using an Ethernet cable. Luckily, the ...Arryved Online Setup Guide
What Is Arryved Online? With Arryved Online, your guests can access your mouth-watering goods at the tip of their fingers whether they are at home, on-premise, or somewhere else! Set up shop in your Arryved Portal and have your very own web link to ...