How To View, Add, & Adjust Employee Shifts
What Are Employee Hours?
Arryved Service tracks the hours worked by each Labor Role for every employee who clocks in and out. In your Arryved Portal, you can view the hours worked by each of your employees and make adjustments if needed.
Prerequisites
To view or adjust employee hours, you need to be a Portal Super Admin or an Admin with one of the following Portal Permissions:
MANAGE EMPLOYENT
ALL ACCESS
FULL ADMIN
If you’re adjusting the Labor Role that an employee worked, the new Labor Role must be assigned to them from their Employee Profile In Arryved Portal.
Limitations
It is important to regularly monitor employee hours and double-check any adjustments you make before clicking the save button! This will help you maintain an accurate payroll.
A shift can’t be deleted. Instead, adjust it to 0 minutes.
How It Works
Head to your Arryved Portal.
From the left side navigation, click Employees.
Click View Hours.
Filter By Labor Role
If you'd like, you can begin by filtering this page by Labor Role.
Select Shift Range
Click the Select Shift Range button on the top left corner of the page to expand the calendars.
Use the calendars to select a period of time you’d like to view employee hours worked.
Click Update.
Breakdown & Employees
Breakdown Section
The Breakdown section shows the total hours worked for each Labor Role clocked in during the selected shift range.
It also shows the total hours worked from tipped Labor Roles versus non-tipped roles.
Employees Section
The Employees section shows the total hours worked for each employee clocked in during the shift range selected.
All Labor Roles worked by that employee are totaled together here.
At the top of the employee list, you can use the Add Shift dropdown to create a shift for an employee from scratch.
Add A Shift
With this tool, you can create a shift from scratch. There are two ways to get there,
Use the Add Shift dropdown next to the “Employees” header at the top of the page. From there you’ll choose an employee from the list.
Click the Add Shift button next to any employee’s shift details below.
From the prompt, you’ll create the shift for this employee by,
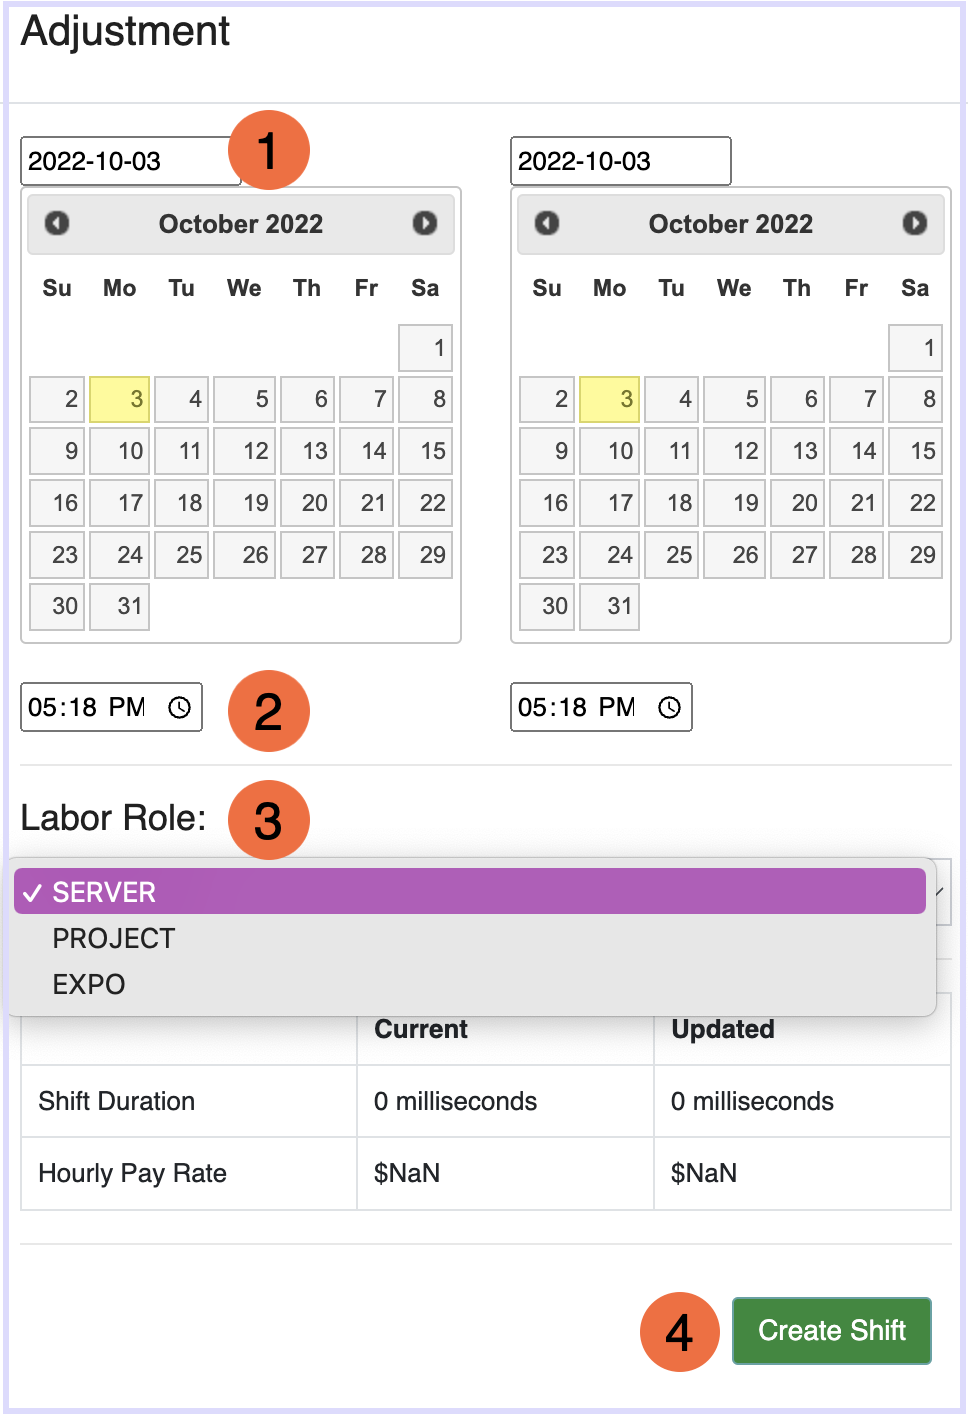
Choosing a start and end date from the calendars. Choose the same start and end date if the shift was during a single day.
Enter the start and end times of the shift.
Choose the correct Labor Role that the employee worked during that shift.
Click Create Shift when finished.
Be sure to double-check what you entered before you save, this may affect the employee’s payroll!
Employees’ Shift Details
As you keep scrolling down this page, you see a detailed list of each shift logged during the shift range selected.
The shifts are grouped by employee name so you can see each shift that the employee worked.
Under each employee's name, the shifts are in subgroups by Labor Role.
Any shift with a discrepancy will be in red. This usually means the employee forgot to clock out and was auto-clocked out sometime the next morning.
Use the Labor Shift Exception report to see these shift discrepancies.
The shift details include the Labor Role, date, start and end time, duration (hours), and pay rate.
Adjust & Split
Adjust
Click the Adjust button next to any shift to make an adjustment. A prompt similar to the Add shift prompt will appear. You can adjust the;
Date of the shift
Start or end time
Labor Role
Split
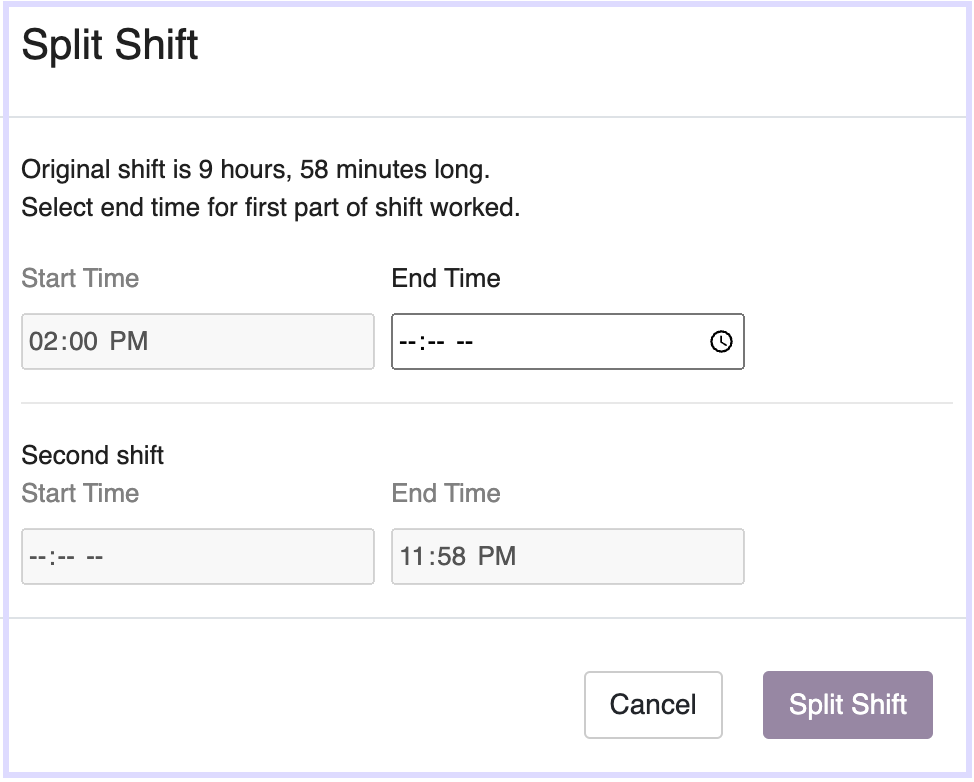
Click the Split button next to any shift to split a shift into two shifts. This is helpful if you need one piece of the shift to be under a different Labor Role.
The top of the Split Shift prompt will tell you how many hours and minutes the entire shift is. Use the two start and end times to create two shifts with the hours allotted.
You cannot exceed the total time of the shift between the two new shift times.
Click Split Shift when finished.
Related Articles
How To Create Employees In Arryved Portal
Related Articles
How To Adjust Loyalty Point Balances
What Are Loyalty Points? Loyalty Points are one of the Insider Perks that drive loyalty and engagement from your Members. Members accumulate Points every time they spend money at your business. They can redeem those Points for Offers and Rewards. ...How To Add Employees In Arryved Portal
Employees In Your Arryved Portal You can manage employees through your Arryved Portal including staff and managers. Here, you can assign them a clock-in / log-in code, and grant access to your Arryved Portal and Arryved Service with Permissions and ...Date & Time Preferences
What Are Date & Time Preferences? Location Preferences, available in your Arryved Portal, allow you to customize the Arryved Product suite, per location, to meet your business needs. The Preferences are broken into sections. The ‘Date & Time’ ...How To Add Online Required Add-ons
What Are Online Required Add-ons? Arryved's Online required add-ons are a way to require an item to be purchased with another item when ordered through your Arryved Online Store. For example, if Someone orders a growler online, they'll need to ...Arryved Portal Permissions Overview
What Are Portal Permissions? There are 29 different Portal Permissions that provide Employees access to certain functionalities in Arryved Portal. Portal Permissions can be added to Employees individually from their Portal profiles. This article will ...