How To Validate A New Device
What Is Device Validation?
Any new Arryved device using Arryved Service or Print Controller needs to be validated before first-time use. You’ll retrieve a validation code from your Arryved Portal and enter it into the validation screen in Arryved Service on your device. Validation is how we get your devices to talk to your Arryved Portal and keep your POS data secure. This article shows you how to validate your device for the first time.
Prerequisites
To retrieve your validation code in Arryved Portal, you need to be a Portal Super Admin or an Admin with one of the following Portal Permissions.
MANAGE HARDWARE, ALL ACCESS, or FULL ADMIN
Arryved Service should already be on your POS devices, courtesy of the Arryved Hardware department. If not, download it from the Play Store.
If you’re validating a Print Controller device, you’ve read the Arryved Print Controller Setup Guide first.
Make sure your devices are connected to the internet and you have a strong connection.
Limitations
- These instructions are for first-time validation. If you need to revalidate your device and retrieve a new code, read How To Revalidate A Device instead.
- The Validation code expires after 30 minutes.
- If you miss the 30-minute window to validate and need to get a new code, you'll have to name the device something different the next time.
- If you generate too many validation codes in a short time, you may be locked out from validating the device and have to wait a day or so.
How It Works
Arryved Portal
In your Arryved Portal, you’ll log your device and retrieve the validation code.
- Head to your Arryved Portal with the proper Permissions.
From the left side navigation, click Devices.
Click Merchant Devices.
You’ll see a list of your devices (if any so far). Click the + Add New Device button at the button of the list.
Give the device a name.
Name it something to help you remember which device it is. The name will appear on the Merchant Devices list.
Arryved’s recommendation: Name it by type of device (Samsung Tab, Phone) and the last 4 characters of the serial number address (found typically in the device Settings > About device > Status). This should be the same as the label on the back of the device if it’s a tablet. It's also helpful to add the station or Venue that the device will be dedicated to such as "Bar Tablet."
Click Save. You’ll see a validation code appear.
Record this code, or keep this webpage up and continue reading the instructions in the next section below.
Arryved Service / Print Controller
Open Arryved Service or Print Controller from your Android device's app list.
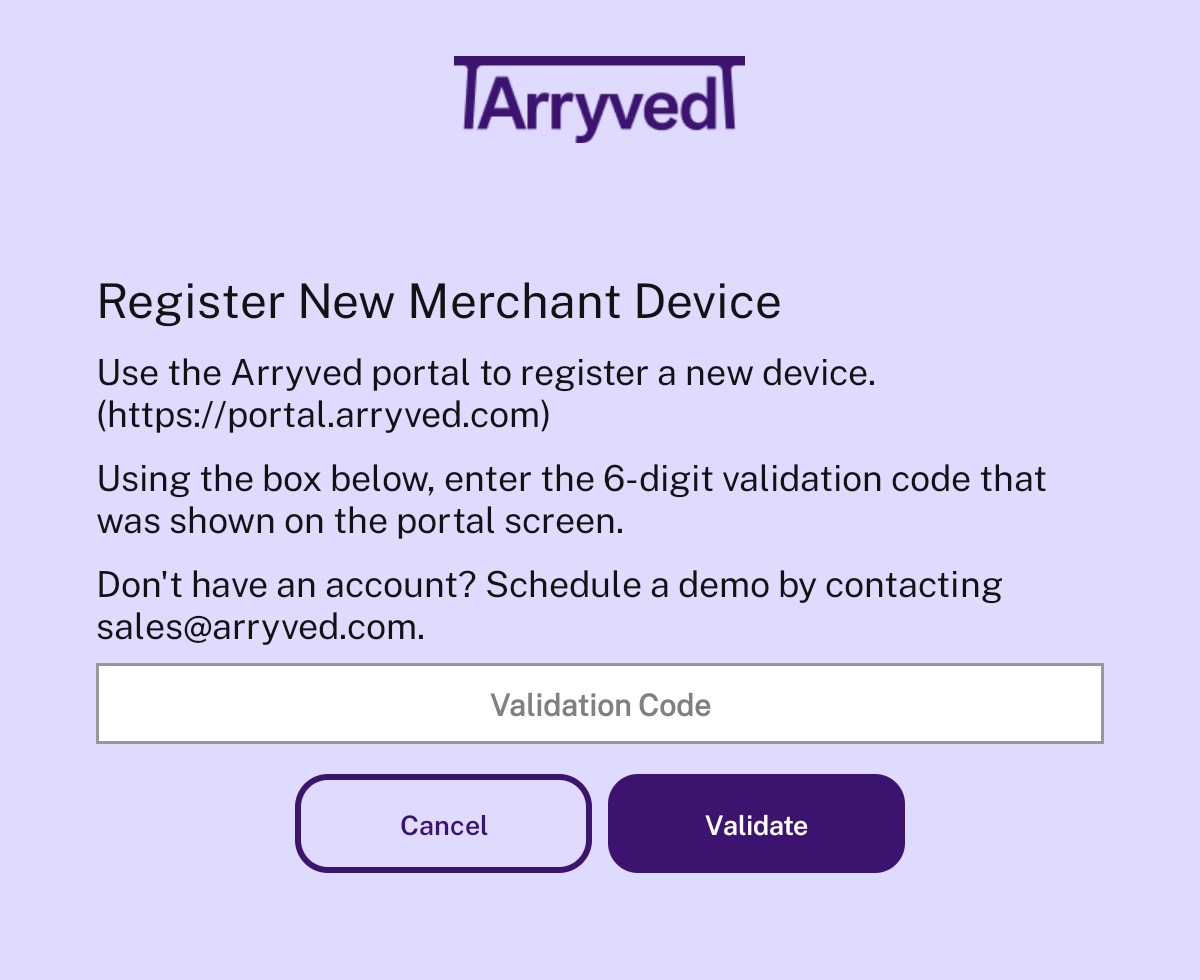
You’ll see the “Register New Merchant Device” screen prompting you to enter a validation code.
Enter the 6-digit code from the Merchant Devices page in your Portal.
Tap Validate.
A successful validation takes you to the clock-in / log-in screen and you’re all done!
Next
Related Articles
How To Revalidate A Device
What Is Device Validation? Validation is how we secure your data and get your POS devices to talk to your Arryved Portal. Any new Arryved device using Arryved Service or Print Controller needs to be validated before first-time use. There are certain ...How To Access My Monthly Merchant Statements
What Are My Monthly Merchant Statements? With Arryved Pay, processing fees are deducted daily with Daily Net Billing. Your monthly Merchant Statements provide a summary of your total daily deductions for each month. The statements also include refund ...How To Enter Your Merchant Peripherals
What Are Merchant Peripherals? Your Peripherals are the hardware that your POS devices are sending orders to. This is either a printer or a KDS device. This article will show you how to log each of your Peripherals in the Merchant Peripherals page in ...How To Add Online Required Add-ons
What Are Online Required Add-ons? Arryved's Online required add-ons are a way to require an item to be purchased with another item when ordered through your Arryved Online Store. For example, if Someone orders a growler online, they'll need to ...How To Read My Monthly Merchant Statement
What Are My Monthly Merchant Statements? With Arryved Pay, processing fees are deducted daily with Daily Net Billing. Your Merchant Statement is provided to you each month and summarizes your total daily deductions for the month. The Merchant ...