Epson Printer Setup Guide (TM Utility)
Epson Printer Wireless Setup With TM Utility
Have a brand new Epson printer you need to set up? Or are you trying to re-configuring your existing Epson printer? This article shows you how to wirelessly configure your Epson printer using the TM Utility App on an Android device.
Prerequisites
A strong and reliable network is the first step in setting up a successful POS system. Please read the following guides if you haven’t already,
You’ll need your Epson printer, the paper to load it, and one of your Arryved POS devices.
You must have the Epson TM Utility app installed on the POS device you’re using to complete these steps. If you purchased the device through the Arryved Hardware Catalog, the app should be pre-installed. If not, you can download it from the Google Play Store.
Limitations
This guide is for printer configuration using the TM Utility app only, but there are two alternate ways to configure if you prefer,
A few error messages may appear as you follow the steps below. Ignore any error messages that pop up and continue with the steps.
Setup Guide
Steps To Follow
Load paper
Printer Startup
Connect to the EPSON PRINTER network
Epson TM Utility App
Enter Merchant Peripheral in Arryved Portal
Step 1: Load Paper
Kitchen printers require you to load both the paper and ink ribbon separately, while receipt printers just require paper.
Plug the printer in.
Grab the paper (and ink ribbon if needed) for this printer.
Open the paper chamber by lifting the gray latch on the top of the printer upward.
Load the paper (and ink ribbon if needed).
Close the paper chamber.
Test the paper by pressing the feed button on the printer and see if it comes out properly.
Restocking Paper & Ink
Here’s what type of paper and ink ribbon you need for each printer type. We’ve provided links to purchase through Amazon, but you can try a different retailer that you’re familiar with.
Epson TM-m30II (Wireless & Ethernet) / TM-T20ii (Ethernet) / TM-88V (Ethernet)
Thermal paper: 3 ⅛” x 230” → Purchase on Amazon
Epson TM-U22OB (Wireless & Ethernet)
Single Ply or 2-ply paper: 3” x 90” → Purchase on Amazon
Ink Ribbon: ERC-38 (black, black/red) (0.55” x 0.63” x 0.67”) → Purchase on Amazon
Step 2: Printer Startup
Begin with the printer turned off.
Make sure the WiFi dongle (USB Stick looking-thing) is connected to the printer. this will grab the WiFi signal we need.
Find the pinhole marked “SW” on the underside of the printer.
Find it next to the phone jack. It may be under the plastic or metal panel that’s easy to peel off.
The pinhole on the impact printers (kitchen style) may not be labeled with an 'SW'. If you can't find it, look for the only pinhole positioned between 2 screws.
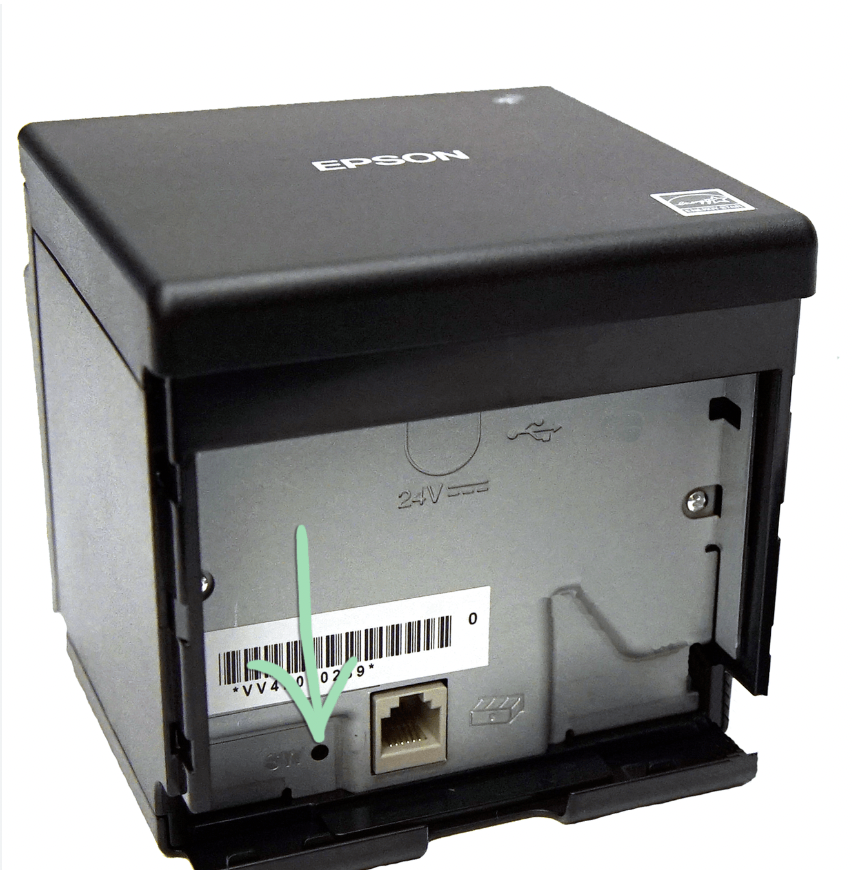
Use a pen, paper clip, or small pointy object to press and hold the button in the pinhole.
Continue holding down the SW button, and at the same time press the power button once, located on top of the printer.
Continue holding down the SW button for about 3 more seconds until the first status sheet prints.
Now, release the SW button and wait about 10-30 seconds for another sheet to print the sheet to print reading “SimpleAP Start”
Some printers may take up to 2 minutes to print the sheet. If the SimpleAP Start sheet does not print after 2 mins. Try again beginning at step 1.
Keep this sheet handy, you’ll need the IP address on it for the last step of this guide.
Step 3: Connect To The EPSON PRINTER Network
Your printer is now broadcasting its own WiFi network that your POS device can connect to.
Grab your Android POS device and find the Settings app (usually a gear icon on the home screen).
Tap Connections.
Tap WiFi.
Tap EPSON PRINTER from the list of available networks.
Password:12345678.
If you can’t connect, begin again from step 1 of this guide.
If you successfully connect, the network reads "connected without internet," that’s ok.
If you see an additional prompt about the connection, tap “Connect One Time.”
Step 4: Epson TM Utility App
Now that you’re connected to the printer’s network, you can use the TM Utility App on your Android POS device to complete the printer configuration.
From the home screen of your POS device, swipe up to open the apps list.
Tap on the Epson TM Utility App to open it.
From the main page of the app, tap anywhere on the blue bar across the top. It should say “Printer is not selected.”
If an error message appears here, ignore it and continue.
If any Permission prompts appear, Tap “Allow”, or “While using the app.”
From the printer selection page, tap on the printer that appears. There should only be one. Remember the name (model number) of it.
The printer model now appears in the blue bar across the top of the main page.
From the main page, tap Wi-Fi Setup Wizard.
From the Wi-Fi setup page, select the printer model from the dropdown list. This is the name of the printer that now appears across the blue bar.
Tap NEXT.
From the Status Check page, tap PRINTED.
If an error message appears reading “The network name (SSID) does not match…,” tap YES to ignore it.
Select your main POS network from the list and tap NEXT.
Tap into the blank bar under “passphrase” to pull up your device’s keyboard. Enter your Wi-Fi password here and tap NEXT.
You’ll see two options to choose from, Auto (DHCP) or Manual. Select Auto (DHCP) and tap NEXT.
You can choose Manual instead if Auto (DHCP) doesn’t work for some reason. On the next page, you’ll assign an IP address for the printer, and enter the Gateway (router’s IP) found in Arryved Service → STAFF → Diagnostics.
Tap SET TO PRINTER.
You may have to wait a minute or two for the printer to do its thing. A final sheet should print.
Tap the TEST PRINTING button to see if the configuration worked. If small sheet prints out of the printer, then you’re all set!
If the test print fails, try a test print from Arryved Service.
If that doesn’t work, repeat the configuration process again from the very first step of this guide.
If the test print was successful, tap FINISH.
Step 5: Merchant Peripherals In Arryved Portal
Now, you need to enter this printer into the Merchant Peripherals page of your Arryved Portal using the IP address you just printed in step 1.
Head to your Arryved Portal.
From the left side navigation, click Devices.
Click Merchant Peripherals.
Read How To Enter Your Peripherals In Arryved Portal for a refresher on how to fill out all the fields.
In the Device ID field, enter the IP address found on the printed sheet.
Click Save.
Related Articles
How To Enter Your Peripherals In Arryved Portal
Epson Printer Wireless Setup Guide (EpsonNet Config)
Epson Printer Setup Guide (Ethernet)
Related Articles
Epson Printer Setup Guide (Ethernet)
Epson Printer Setup With Ethernet Have a brand new Epson printer you need to set up? Or are you trying to re-configuring your existing Epson printer? This article shows you how to configure your Epson printer using an Ethernet cable. Luckily, the ...TM-M30III Printer Setup Guide (TM Utility)
Epson TM-M30III Wireless Printer Setup Have a brand new Epson TM-M30II printer you need to set up? Or are you trying to re-configuring the one you already have? This article shows you how to wirelessly configure in a few easy steps. Prerequisites ...Epson Printer Troubleshooting
Troubleshooting Your Epson Printer Having issues with your Epson Printer? Try the following troubleshooting tips. Prerequisites First, consider your printer’s symptoms, Is it just one printer or all of them? If it’s just one printer, there must be an ...Epson Printer Setup Guide (Wireless EpsonNet)
EpsonNet Wireless Printer Setup Have a brand new Epson printer you need to set up? Or are you trying to re-configuring your existing Epson printer? This article shows you how to wirelessly configure your Epson printer using the EpsonNet Config on an ...Epson KDS Hardware Checklist
Overview In this article, you will find a list of all the physical hardware you need for your KDS. Notice that some items are provided by Arryved and some items you will need to source on your own. The items labeled "optional" may be important, ...