How To Transfer Devices From Sandbox To Arryved Service
Transferring Your Devices From Sandbox To Arryved Service
Congratulations! You’ve reached the final task in your Arryved onboarding process! It’s time to get rid of your Arryved Sandbox Service used for training and testing and connect your devices to your live Arryved Service where transactions can really take place. Use this guide to complete your device transfer.
Prerequisites
To complete the steps in this guide, you must be an Arryved Portal Super Admin or an Admin with one of the following Permissions:
MANAGE HARDWARE
ALL ACCESS
FULL ADMIN
Have your POS devices handy.
Have your Gmail login credentials handy that you created for your Arryved POS. If you haven’t done this already, use the Gmail Setup Guide.
How It Works
Steps To Follow
Delete Arryved Sandbox Service
Set Arryved Service to auto-update from Google Play
Validate Arryved Service
Make Arryved Service transaction-ready
Step 1: Delete Arryved Sandbox Service
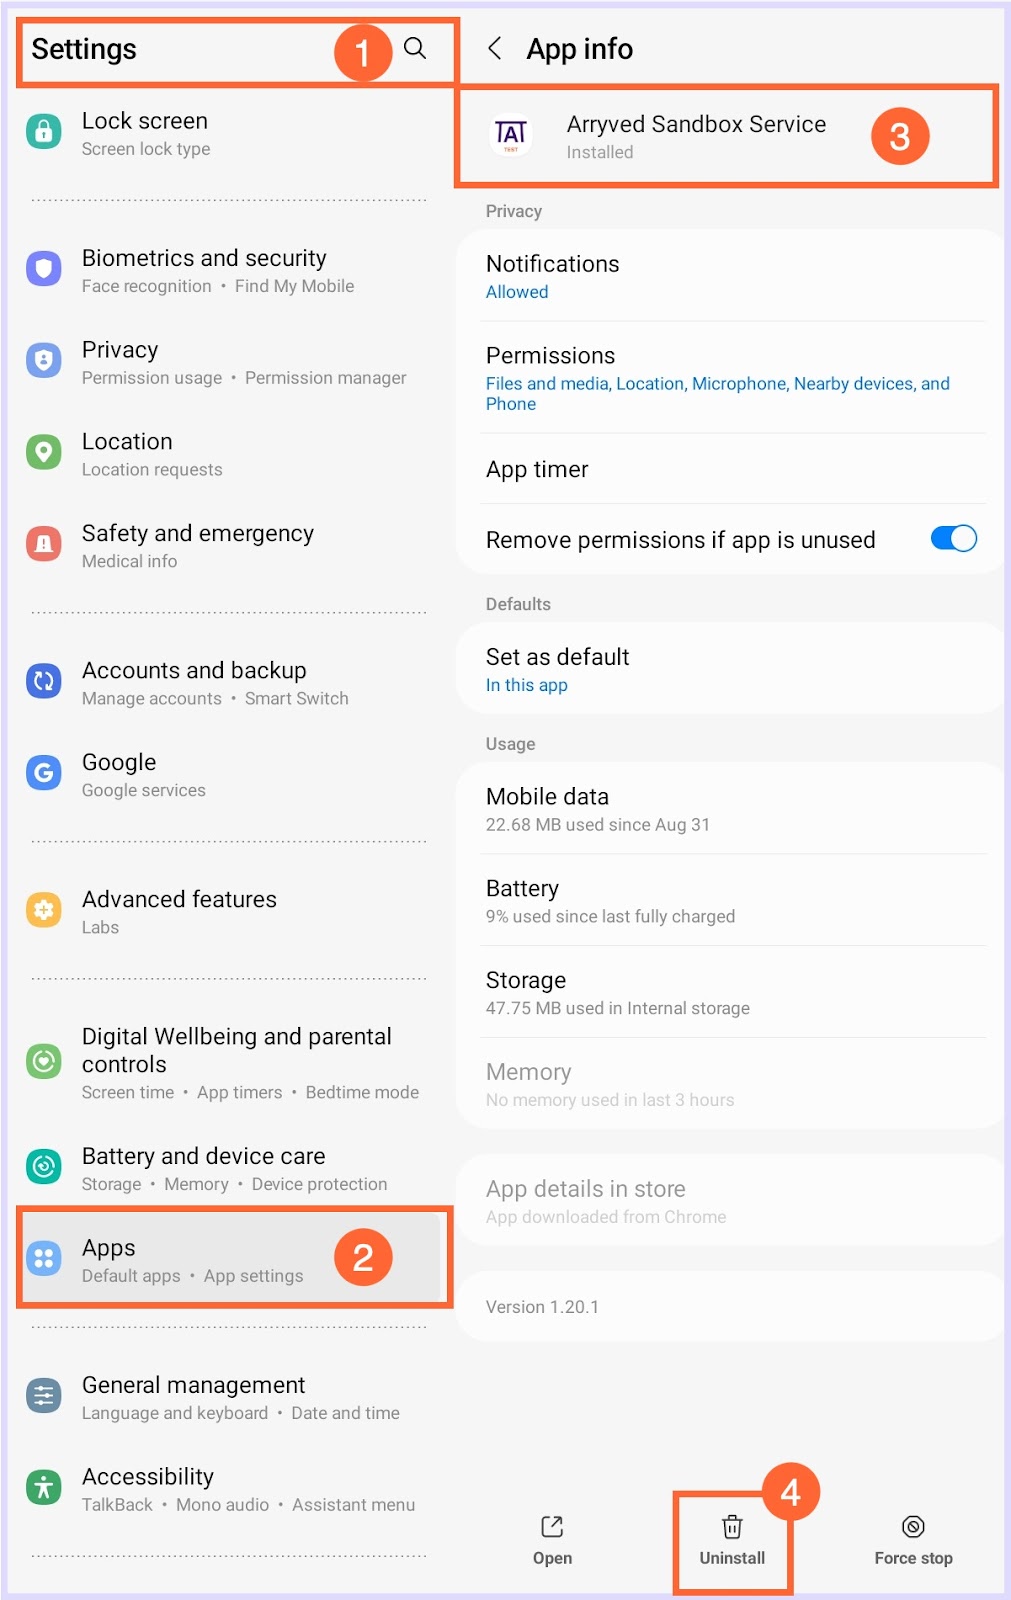
First, let’s delete Arryved Sandbox Service from any of your Android POS devices that have it so that the testing app doesn’t get confused with your live Arryved Service app.
Grab your POS device that has Arryved Sandbox Service on it.
Open the Android Settings (look for the gear icon).
From the options on the left side, tap on Apps.
From your list of apps, tap on Arryved Sandbox Service.
Tap Uninstall from the bottom of the screen.
Tap OK to confirm.
Repeat these steps on all your POS devices with Arryved Sandbox Service.
Step 2: Set Arryved Service To Auto-update
With Sandbox gone, it’s time to set your live Arryved Service app to auto-update from Google Play, on each of your POS devices. We do this to ensure you’re always using the latest version of the POS that supports all of our updates and new features.
If any of your POS devices are missing Arryved Service, you can download it from Google Play now.
Grab your POS device.
Open Google Play from your apps list.
Log into Google Play using the Gmail account you created for your Arryved POS.
Use the Gmail Setup Guide if you don’t have one yet.
Use the search bar and type in ‘Arryved Service’.
Set Arryved Service to auto-update using the How To Auto-Update Apps guide.
Auto-updates generally happen when the device is powered off and plugged in. We strongly recommend power cycling all POS devices at the end of each day to allow for auto-updates and ensure a full charge or the next day of service.
Step 3: Validate Arryved Service
If you’re opening Arryved Service for the first time on a POS device, it needs to be validated. Add the device to your Arryved Portal and grab the validation code. Use the guide below to complete this step.
Step 4: Get Arryved Service Transaction Ready
In this final step, you’ll get your POS devices ready for transacting! Use the guide below to connect your printers, card readers, and cash drawers in Arryved Service.
Related Articles
How To Set Up Arryved Service For The First Time Guide
Related Articles
How To Download Sandbox
What Is Arryved Service Sandbox? Arryved Service is the POS product you'll use to place orders, manage tabs, and more! Arryved Service Sandbox is a replica of Arryved Service, but in a testing environment. Sandbox is used during the Arryved ...New POS Device Setup Guide
What Is A New POS Device? Have a new device fresh out of the box? Let’s get it set up for success! This article walks you through the steps to turn your Android device into an Arryved POS. If your POS device was purchased from the Arryved catalog, ...Arryved Hardware Considerations
Purchasing Arryved Hardware As a newly launching Merchant with Arryved, you’ll need to get your hardware set up to best meet your business needs. Use this guide to aid you in your hardware purchase. It’ll show you what we offer and what to consider ...How To Log Into Arryved Portal Or Sandbox
What Is Arryved Portal And Sandbox? Arryved Portal is your tool for customizing and managing all your business and POS needs with Arryve. Your company information, inventory, employees, reporting, and more live in your Arryved Portal. The Arryved ...How To Create A Cash Tip Tab In Arryved Service
What Is A Cash Tip Tab? A cash tip tab can be created in Arryved Service as a way to include cash tips into your tip pool. The cash tips will appear on whichever report you are using to allocate tips to employees, eliminating the need to divvy out ...