New! An Easier Way To Start A Tab In Arryved Service
What Is The New, Easier Way To Start A Tab?
When guests are simply trying to enjoy themselves, and staff are juggling many tasks at once, every second spent in the service flow counts! In an effort to support and enhance our customers’ commitment to excellent service, Arryved is remodeling the steps it takes to start a tab in Arryved Service. We know this is something that staff have to do countless times during a shift so to make lives easier, it’ll take fewer taps of the finger to achieve this frequent task. Read this guide to learn the newer, easier way to open a tab in Arryved Service.
Prerequisites
To enjoy this new flow to starting a tab, you must have Arryved Service updated to 1.29 or higher on each of your POS devices. We recommend setting Arryved Service to auto-update.
How It Works
With Arryved’s new flow for starting a tab, there are now two new ways to achieve this task:
Single-tap the ‘New’ button
This takes you to the new order screen where you can add items to the order before grabbing card information.
When you’re ready to swipe, the card reader will auto-connect. We’ve removed the ‘Swipe’ button!
Long-tap the ‘New’ button for a full second or two
This bypasses the new order screen and takes you straight to a swipe, saving you even more taps of the finger! This works best in scenarios where starting a tab is first and foremost, before adding items to the order.
- Keep reading to see how these two flows work.
Single-Tap The ‘New’ Button
Open Arryved Service, log in, and make sure you’re working under the correct Venue. Now, here’s how to start a tab with fewer finger taps!
From the TAB screen, tap the ‘New’ button at the bottom.
Tap the ‘Set Guest’ text at the top of the new order screen.
This text formerly said ‘No User Set’.
Wait for the green ‘Reader connected’ message, then swipe a card through the reader.
You no longer need to tap ‘Swipe’ first! The reader will connect on its own.
Tap Done to leave the screen.
Add items to the order if needed, then tap Send.

More Info
You no longer need to tap the ‘Swipe/Reader’ button before swiping a card. Just wait for the green ‘Reader connected’ message to appear, then swipe the card through the reader. This eliminates one unnecessary finger tap!
If your reader isn’t paired, a ‘Select a reader’ button will be visible so you can easily pair it without leaving this screen!
Once you swipe the card through the reader, the cardholder name will auto-fill in the Tab Name field.
You can keep that cardholder name, or erase it with the X button, and type in whatever you’d like instead.
If you don’t need to swipe a card, you don’t have to. To start a tab without a card on file:
- Enter something in the ‘Tab Name’ field or tap the Table button to assign a table number.
- Tap Done to save the info.
Long-Hold The ‘New’ Button
To save even more effort through this process, we have an alternative for you! Here’s how to start a tab with even fewer finger taps!
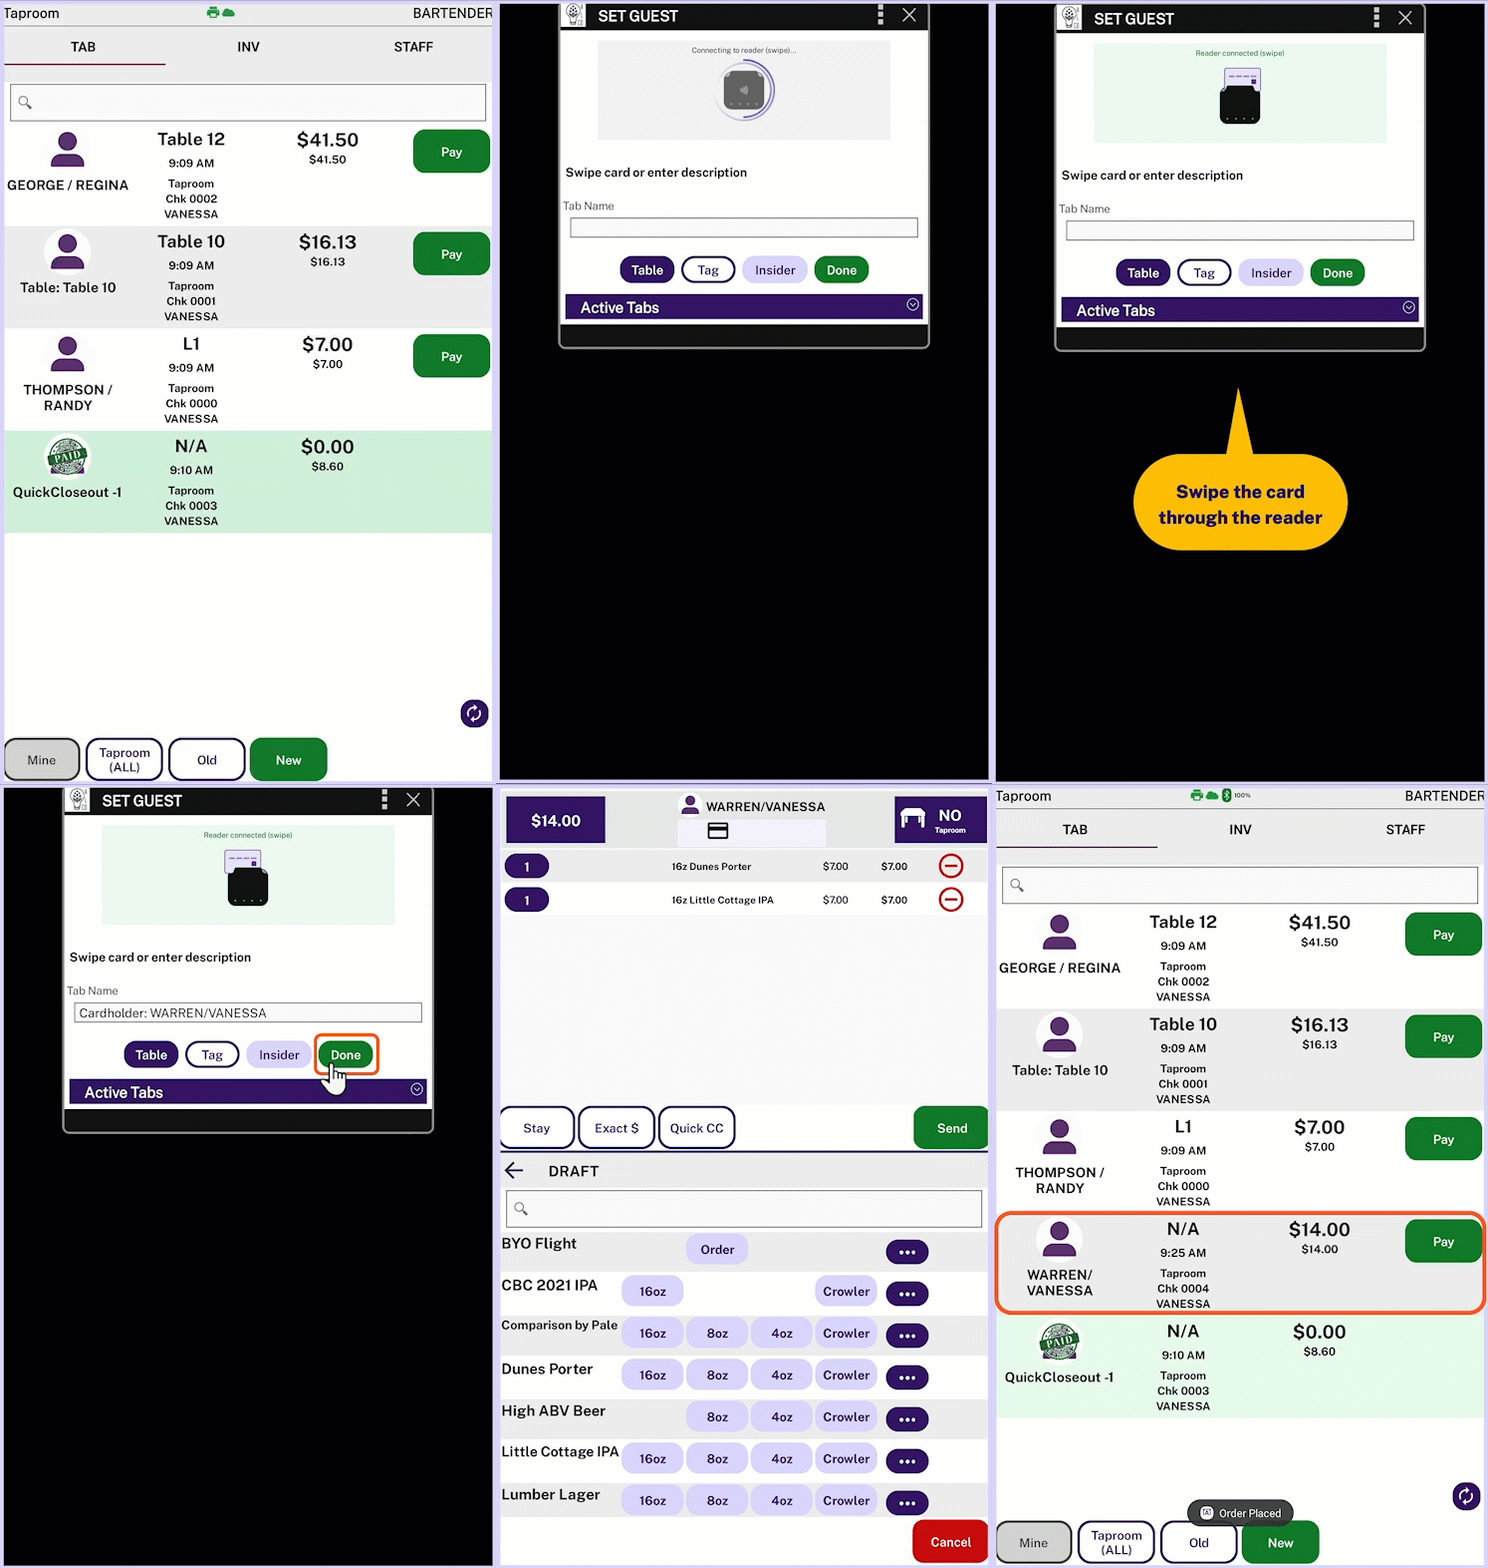
From the TAB screen, press and hold (long-hold) the ‘New’ button for a full second or two and wait for the ‘SET GUEST’ window to appear.
When the green ‘Reader connected’ message is shown, swipe a card through the card reader.
Tap Done to leave the screen.
Add items to the order if needed, then tap Send.
More info
This method surpasses the new order screen, eliminating the need to tap the ‘Set Guest’ text. So, this flow eliminates two unnecessary finger taps! Keep in mind that this flow requires starting the tab, first, before items can be added to the new order.
Remember, you can always enter a tab name or select a table number instead of leaving a card on file.
Your device’s Android Settings control the long-hold function for all of your apps, including Arryved Service. Read more about Android’s Touch & Hold settings.
Related Articles
How To Pair Your MagTek Card Reader
How To Switch Between Card Readers In Arryved Service
How To Start A Tab In Arryved Service