DynaFlex II Go Setup Guide
What Is The DynaFlex II Go?
The DynaFlex II Go is Arryved’s latest EMV card reader that offers tap, dip, swipe, and digital wallets all in one! The DynaFlex is exclusive to Arryved Pay, our end-to-end payment solution with in-house payment processing. Use this guide to set up your new DynaFlex II Go card reader with Bluetooth pairing and mounting.
Prerequisites
Use this guide once you’ve received your new DynaFlex II Go card readers. Have them fully charged and the mounting pieces handy.
Grab the POS devices you want to pair with your new card readers.
You must update Arryved Service to the latest version on all your POS devices with a DynaFlex II Go card reader to ensure you’re operating with the latest improvements.
Limitations
Treat your DynaFlex with care. Be careful not to drop, hit, or shake the reader. If it endures too much physical damage, it may go into Tamper Mode and will need to be swapped out for a new one.
If you’ve opted out of Preauthorization with Arryved, your card reader may not be able to detect expired cards or start a tab with digital wallets.
Digital wallets will not grab the cardholder’s name when starting a tab. A Tab Name will need to be manually entered or a Table Number selected.
If the POS device is offline or in Offline Mode, it will not grab the cardholder’s name when starting a tab. Offline Mode also can’t detect expired cards.
The DynaFlex II Go doesn’t support gift cards with Track 1 data. Track 2 is supported. You won't need to worry if you’ve purchased gift cards from one of our recommended suppliers (eCard Systems or 4ics).
Do not mount the card reader to the POS device directly. Mount the provided clip so you can attach and remove the card reader at any time to set it aside for charging or to view the serial number on the back of it. The serial number is needed for pairing.
If you're using Arryved Insider, the DynaFlex II Go card reader won't recognize vaulted cards attached to an Insider Membership. Service staff will need to manually look up an Insider Membership in Arryved Service to associate it with their tab.
Setup Guide
Steps To Follow
Remove old card readers (if needed)
Mount the DynaFlex II Go to your POS device
Pair the DynaFlex II Go with your POS device
Step 1: Remove Old Card Readers
If you’re swapping out old card readers with the new DynaFlex II Go, you must first remove the old ones that are currently mounted to your POS devices.
Grab the POS devices you want to pair with your new card readers.
For any easily detachable card readers and koozies, go ahead and remove those first.
For koozies that are attached with sticky tape, twist them to detach. Don’t pull!
Pro Tip! Try sliding a piece of floss back and forth in between the koozie and POS device to detach the sticky tape.
Use Isopropyl or alcohol wipes to remove any sticky residue. A clean surface is necessary to attach the new reader.
Step 2: Mount The DynaFlex II Go
Stand-Alone
The new DynaFlex II Go card readers can live in a stand-alone dock and be placed on any surface. It’s able to transact while in the dock and be removed from the clip when needed.

Attached To The POS Device
If you want the card reader to be directly mounted to your POS device, attach the clip with sticky tape:
Find the perfect spot for the clip on your tablet, handheld, or foam case.
See the image examples below for the best placement. Make sure the card dip/swipe ports aren’t blocked by anything, and the card will have room to be inserted or swiped.
On a handheld device, you’ll probably want the dip/swipe ports to face downward so the card can be inserted from the bottom of the device.
On a tablet stand or foam case, the dip/swipe ports should be facing upward so the card can be inserted from the top of the device.
Be sure the surface area is clean. Use alcohol wipes to remove residue, dust, and oils.
Remove the backing of the sticky tape and apply it to the back of the mounting clip.
Make sure the outer edge of the clip is facing in the correct direction so that tap, dip, swipe, and the charging port are accessible (see image examples below). Press the clip into the POS device. Hold for 30 seconds.
Wait 24 hours before applying weight to the clip for maximum hold.
After 24 hours, pop the reader into the clip. Be sure the charging port and the tap, dip, and swipe ports are positioned correctly.

Step 3: Pair The DynaFlex II Go
You can have the DynaFlex II Go card reader paired via Bluetooth or connected via USB-C cable. We strongly encourage you to use the cable that was provided to you for maximum compatibility and stronger connections.
USB-C PAIRING
Grab the USB-C cable and attach one end to the card reader and the other end to the POS tablet or handheld. This will speed up the connection and keep the battery levels strong.
Open Arryved Service and log in.
Tap STAFF.
Tap Settings.
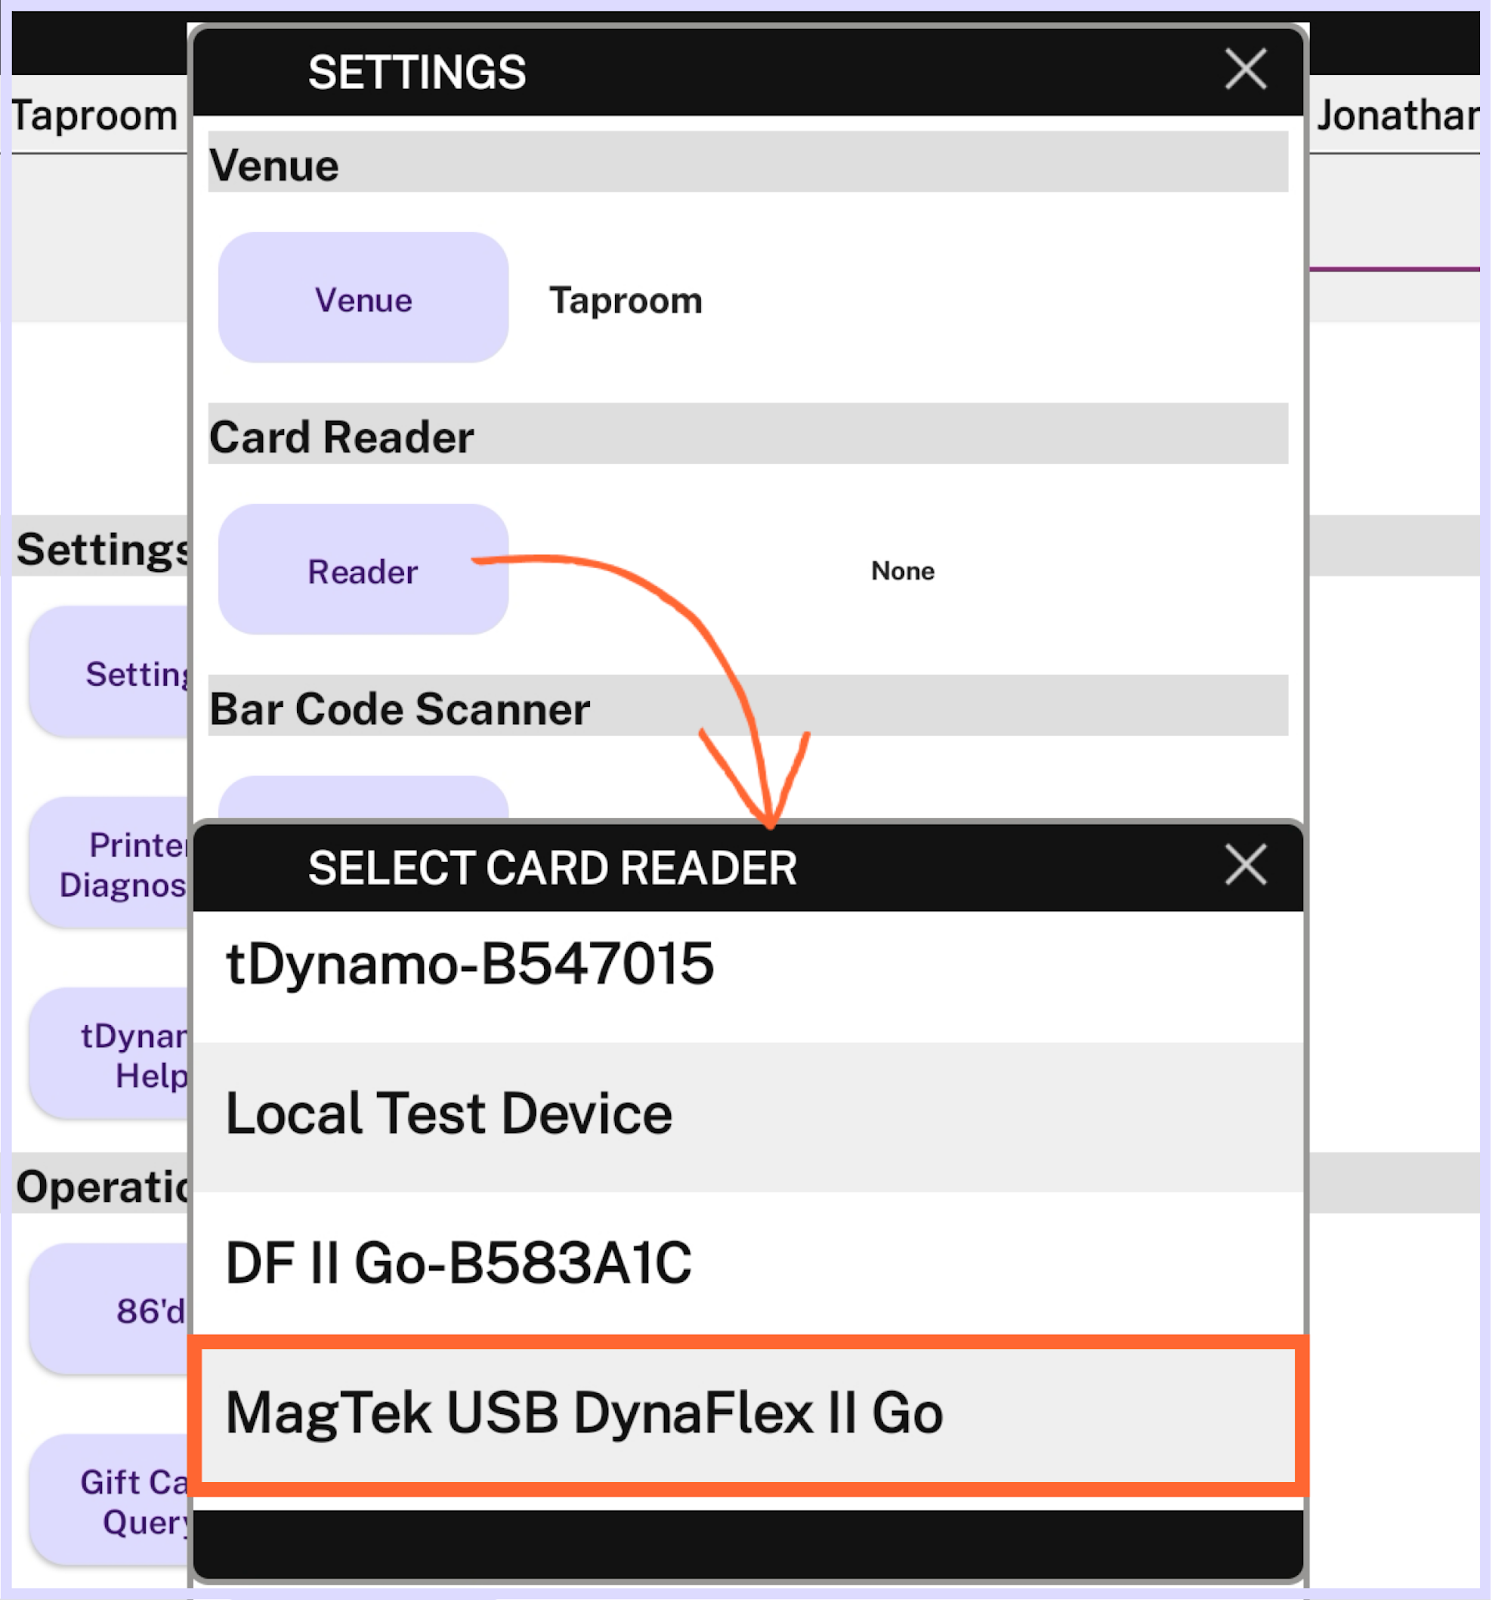
Tap the Reader button.
Select the “MagTek USB DynaFlex II Go”.
A confirmation modal will appear at the bottom of the screen. Click OK to confirm the pairing.
BLUETOOTH PAIRING
If you want to pair the card reader via Bluetooth, there’s just one extra step in Arryved Service.
Put the card reader in Pairing Mode (hold the pushbutton down for 4 beeps and see the first and last LED flashing).
Open Arryved Service on the POS device you want to pair with.
Toggle to the STAFF screen.
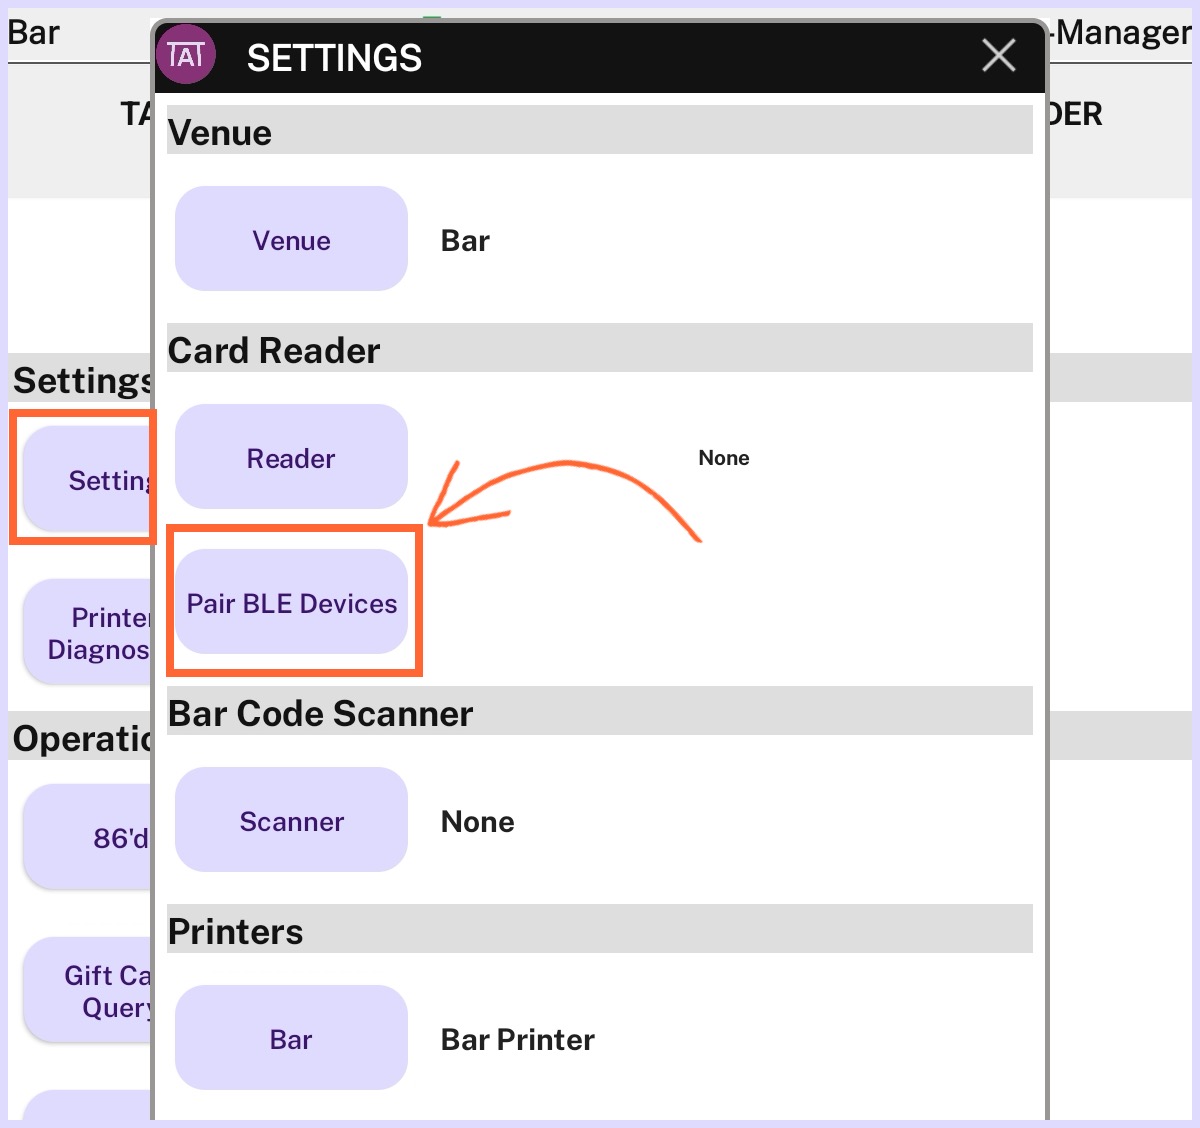
Tap Settings.
Tap Pair BLE Devices.
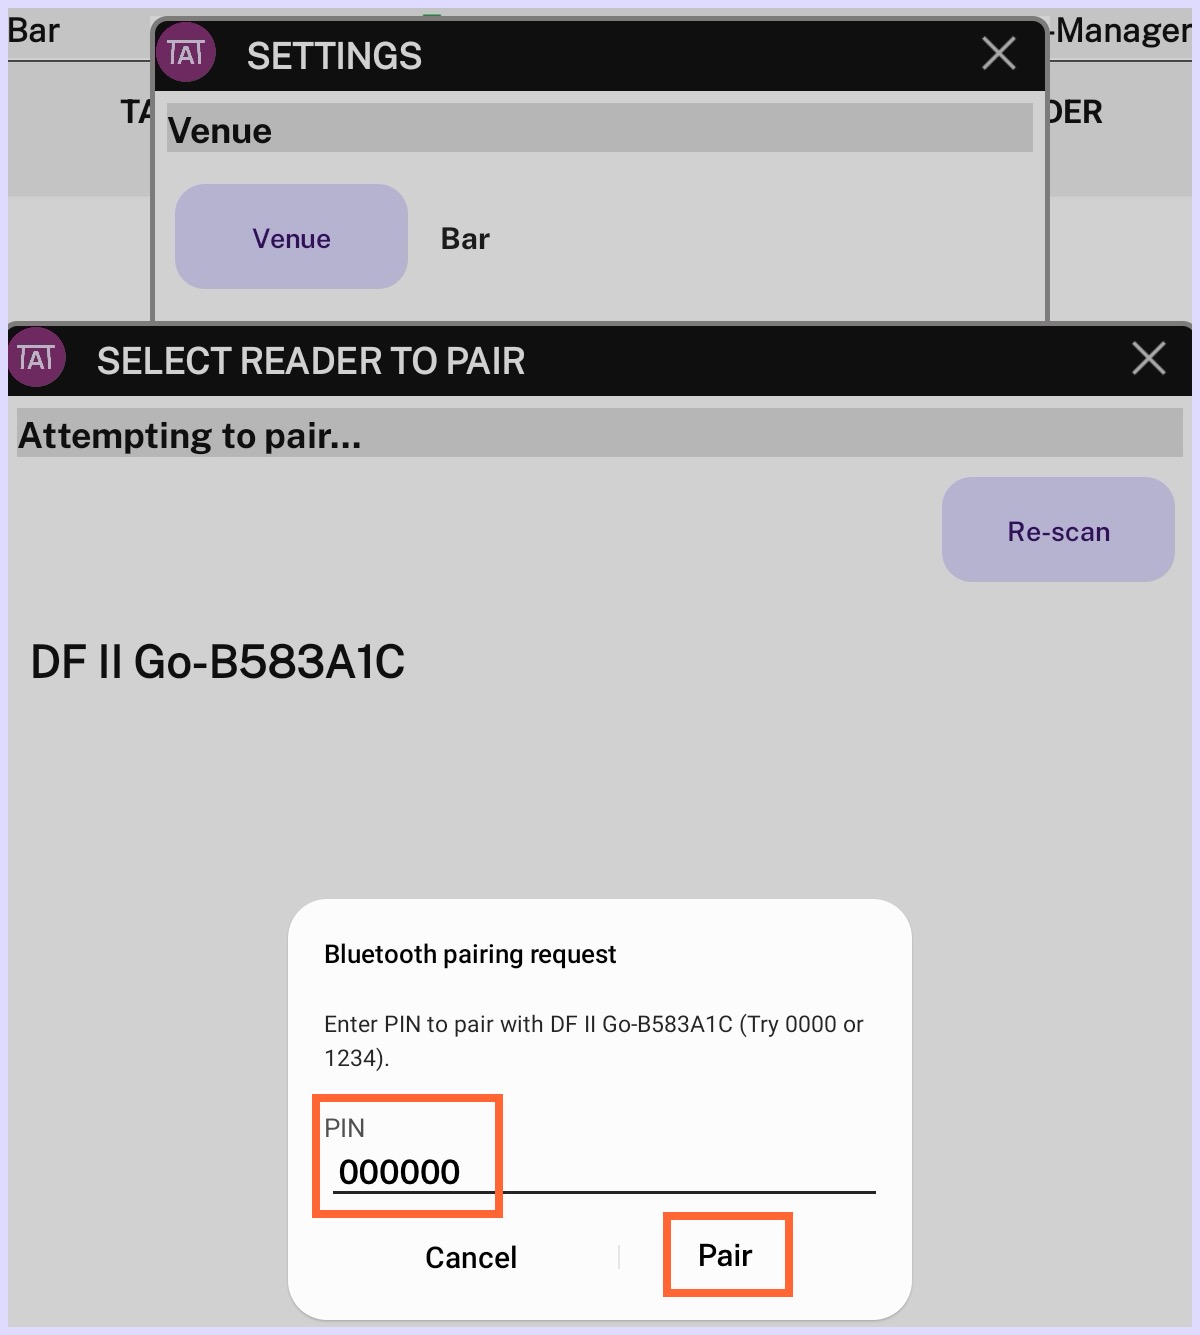
You should see the DF II Go-B[xxxxxx] reader with the matching serial number on the list. Tap the Scan button if you don’t see it.
To find your serial number, look on the sticker on the back of the card reader next to ‘SN: B[xxxxxx]’.
When it prompts you for a PIN, enter ‘000000’ (that’s 6 zeros), then tap Pair.
If pairing was successful, you see a success message, and the reader will now say “already paired’ next to it. You can now X out of that window.
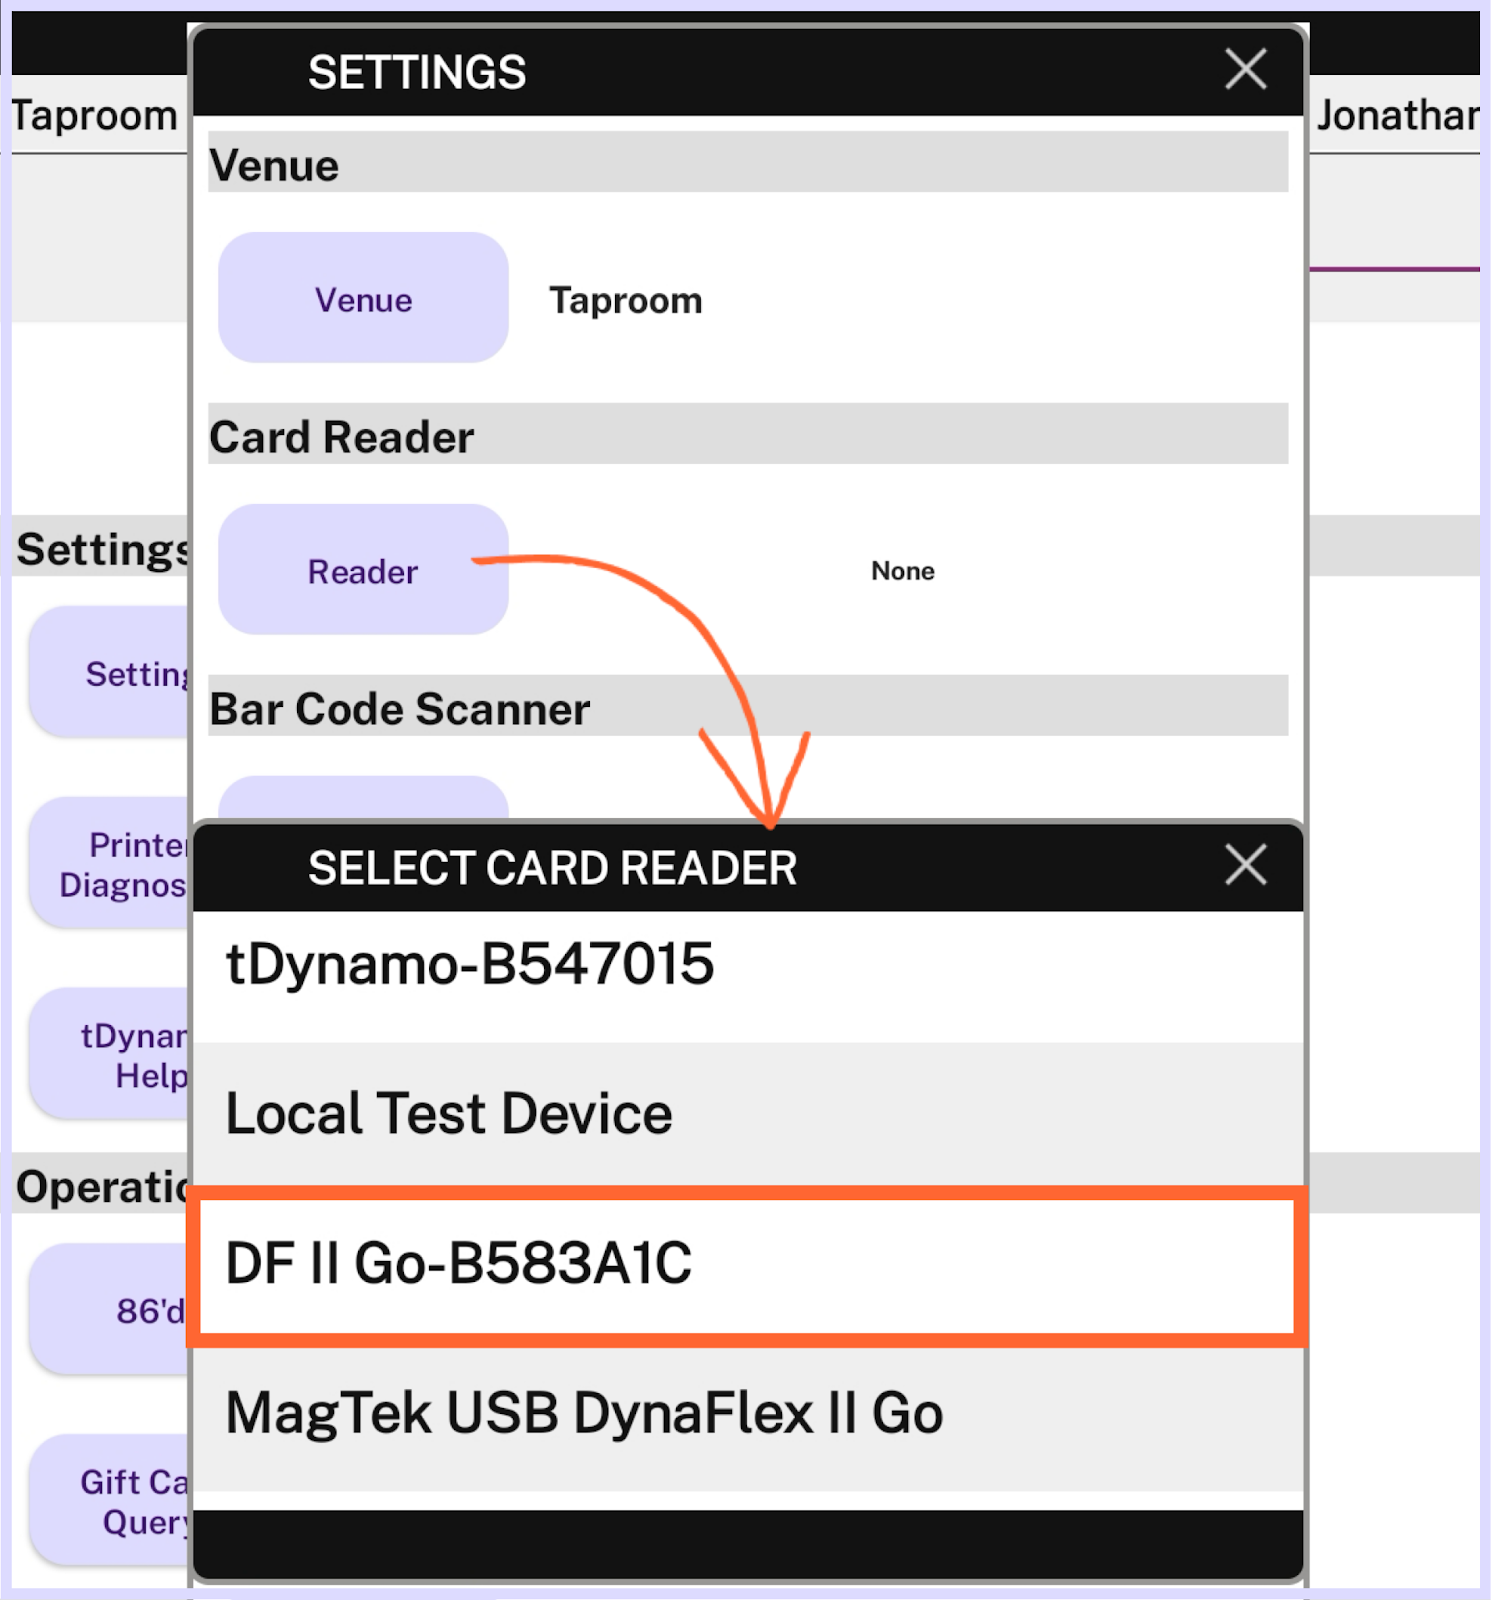
Now, tap on the Reader button on the Settings window.
Look for the same DF II Go-B[xxxxxx] reader and tap on it to select this reader to use with this POS device today.
Your reader will remain selected on this screen until you go in and select a different reader, so you don’t have to do this every day.
Lastly, you need to reset the reader after pairing. Hold the pushbutton down until you hear 2 beeps and see all the LEDs turn off. Wait a few seconds, then turn it on again by holding the button for 2 beeps.
Put the card reader in Pairing Mode (hold the pushbutton down for 4 beeps and see the first and last LED flashing).
Open Arryved Service on the POS device you want to pair with.
Toggle to the STAFF screen.
Tap Settings.
Tap Pair BLE Devices.
You should see the DF II Go-B[xxxxxx] reader with the matching serial number on the list. Tap the Scan button if you don’t see it.
To find your serial number, look on the sticker on the back of the card reader next to ‘SN: B[xxxxxx]’.
When it prompts you for a PIN, enter ‘000000’ (that’s 6 zeros), then tap Pair.
If pairing was successful, you see a success message, and the reader will now say “already paired’ next to it. You can now X out of that window.
Now, tap on the Reader button on the Settings window.
Look for the same DF II Go-B[xxxxxx] reader and tap on it to select this reader to use with this POS device today.
Your reader will remain selected on this screen until you go in and select a different reader, so you don’t have to do this every day.
Lastly, you need to reset the reader after pairing. Hold the pushbutton down until you hear 2 beeps and see all the LEDs turn off. Wait a few seconds, then turn it on again by holding the button for 2 beeps.
Gut Check!
In Arryved Service, start and close a few test tabs to see if the card reader is paired and working properly!
If you’re having trouble getting your Bluetooth to connect, try turning the reader off and back on again just after you complete the pairing steps.
Related Articles
DynaFlex II Go Troubleshooting
How To Transact With DynaFlex II Go
Best Practices For EMV Card Reader Battery
Related Articles
DynaFlex II Go Overview
What Is The DynaFlex II Go? The DynaFlex II Go is Arryved’s latest EMV card reader that offers tap, dip, swipe, and digital wallets all in one! The DynaFlex is exclusive to Arryved Pay, our end-to-end payment solution with in-house payment ...DynaFlex II Go Troubleshooting
What Is The DynaFlex II Go? The DynaFlex II Go is Arryved’s latest EMV card reader that offers tap, dip, swipe, and digital wallets all in one! The DynaFlex is exclusive to Arryved Pay, our end-to-end payment solution with in-house payment ...How To Transact With DynaFlex II Go
What Is The DynaFlex II Go? The DynaFlex II Go is Arryved’s latest EMV card reader that offers tap, dip, swipe, and digital wallets all in one! The DynaFlex is exclusive to Arryved Pay, our end-to-end payment solution with in-house payment ...Arryved Online Setup Guide
What Is Arryved Online? With Arryved Online, your guests can access your mouth-watering goods at the tip of their fingers whether they are at home, on-premise, or somewhere else! Set up shop in your Arryved Portal and have your very own web link to ...Epson Printer Setup Guide (TM Utility)
Epson Printer Wireless Setup With TM Utility Have a brand new Epson printer you need to set up? Or are you trying to re-configuring your existing Epson printer? This article shows you how to wirelessly configure your Epson printer using the TM ...