How To Create Timed Menus
What Are Timed Menus?
Timed Menus are your tool for creating happy hour, lunch & dinner menus, weekly specials, and more! In your Arryved Portal, you can create Timed Menus in your Venues, and schedule when they become available and unavailable to order from. Read this article to learn how to create Timed Menus through your Arryved Portal.
Prerequisites
The 'Timed Menus' Location Preference must be enabled by an Arryved Portal Super Admin.
To create Timed Menus in your Arryved Portal, you must be a Portal Super Admin or an Admin with one of the following Portal Permissions:
TIMED MENU CONFIGURATION or ALL ACCESS
Limitations
Timed Menu Schedules won’t operate on a device that’s in Offline Mode.
Inventory Items that have both normal Unit Sizes and Timed Unit Sizes are separated in Arryved reports that are filtered by Unit SIze.
If Inventory Items live both on your normal menus and on a Timed Menu, those items will appear twice when the Timed Menu is active. If you’d like, you can make all of your menus timed so that when one appears, the others hide. This isn’t necessary unless you prefer it this way.
How It Works
Your normal menus are always active unless manually made inactive through your Arryved Portal.
Timed Menus become active and inactive based on the schedule you create.
Timed Menus are Active and visible along with your normal menus during their scheduled times.
Timed Menus are Inactive and hidden when outside of the scheduled times.
A single Inventory Item can live both on a normal menu and a Timed Menu using different Unit Sizes. The Unit Sizes are what appear and hide on the Timed Menu.
Unit Sizes and Menus talk to each other using their Pricing Types.
Timed Menus can be created for Arryved Service, Arryved Online, and OpenTab.
Steps To Follow
Create New Unit Sizes (if necessary)
Configure Inventory Items
Create A New Timed Menu
Create The Menu Schedule
Step 1: Unit Sizes
Perhaps you have items you want to live both on your normal menus and a Timed Menu, such as items discounted during happy hour.
In this case, you’ll have your normal Unit Size(s) given to that Inventory Item matched to your normal menus. And, have separate Timed Unit Size(s) matched to the Timed Menu.
You don’t need to create separate Unit Sizes If the Inventory Items only live on one menu type. For example, your Wednesday night chili special (Timed Menu only).
Here’s a refresher on How To Create Unit Sizes. Let’s use the happy hour example, draft beers and some appetizers are offered at a discounted price during happy hour.
You can create one universal Happy Hour Unit Size and apply it to any Inventory Items that’ll be on happy hour. As long as you’re only offering one size during happy hour, such as only pints on draft and one-sized appetizers.
If you’re offering let’s say, pints and tasters of draft beer at a discounted price for happy hour, you need to create separate happy hour pint and taster Unit Sizes.
When creating a Unit Size, the Button Display field is what appears on the size’s button in Arryved Service to add that item to the order screen.
Leave the Button Priority at Column 1 for Timed Unit Sizes.
Step 2: Inventory Items
Once your Timed Unit Sizes are created, you’ll add them to your Inventory Items and pick a Pricing Type. If you didn’t create any new Unit Sizes, you still need to configure the Pricing Type for the item’s existing Unit Sizes. Think about which items you’ll want on this Timed Menu.
Here’s a reminder on How To Create An Inventory Item if you need to create a brand-new item for your Timed Menu.
Read How To Add Unit Sizes To Inventory Items if you’re adding new Unit Sizes to your existing inventory.
Price
From the Costs section of the Inventory Item, add the new Timed Unit Size(s).
Add a price to the Unit Size(s). A happy hour price would be less than a normal price.
Pricing Types
From the Pricing Type dropdown next to the Unit Size, there are four Pricing Types to choose from. You’ll pick the same Pricing Type for your Timed Menu in a later step.
Normal: Most of your menus and Unit Sizes are set to Normal. These normal Unit Sizes are on your normal menus and are always active by default.
Lunch, Happy Hour, Special: These are your Timed Menu and Timed Unit Size Pricing Types. The three operate the same and are only labeled differently so you can choose how you want to label your Timed Menus.
The Pricing Type chosen here next to the Timed Unit Size must match the Pricing Type of the Timed Menu they will live on. That way it’ll listen to that menu’s schedule.
Save
After you’ve,
Added the Timed Unit Size(s)
Entered a price
Picked a Pricing Type
Click Save from the Inventory Item page! Repeat this process for all Inventory Items you’ll be placing on the Timed Menu.
Step 3: Create The Timed Menu
In your Arryved Portal, click Venue from the left side navigation.
Choose the Venue that you’d like the Timed Menu to live in.
For example, maybe your happy hour menu will be available in your Bar Venue.
Under the Menus section of the Venue, click the plus sign (+) at the end of your menu list.
Give the menu a name in the Description box (such as “Happy Hour”) and click Create.
Notice the Active checkbox in the top left corner. When the box is checked, the menu is Active (available). if unchecked, the menu is Inactive (unavailable).
The Timed Menu’s Schedule will automatically check this box during the scheduled times and uncheck it when outside the scheduled times.
You can manually check and uncheck the box at any time, but the next scheduled timeframe will be the boss of the checkbox.
Select one of the Timed Pricing Types from the dropdown. It needs to match the Pricing Type of the Timed Unit Sizes that you added to the Inventory Items you want to appear on this menu.
Scroll down and add the desired Inventory Items to this Timed Menu using the green boxes. Click on a single item to add it or click Add All to add that entire Item Type.
If adding all, only Inventory Items from that Item Type with the same Pricing Type as this menu will actually appear on this menu.
When you’ve added all the desired items to this menu, scroll to the top and click Menu Schedule on the right side and continue to the next section of this guide.
Step 4: Menu Schedule
In this step, you’ll create a schedule for when this Timed Menu becomes Active.
From the menu’s schedule builder, click the plus sign (+) to add a timeframe.
If you’re adding more than one timeframe, add them all at once. So if you are creating 3 timeframes, click the plus sign three times consecutively before editing a timeframe.
If you don’t do it this way, you’ll need to click Save Schedule after configuring each timeframe before adding the next one.
You can enter a Note for each timeframe but are not required to.
Pick a start/end day and time for each timeframe. You need to select something from each dropdown or the schedule won’t properly save.
The backend reads the schedule every 5 minutes. To ensure your Timed Menu appears right on time, you can add a 5-minute buffer on both ends of each timeframe.
Once the schedule is fully filled out, click Save Schedule from the top right corner.
Once your schedule is saved, you’re finished! The Timed Menu now becomes available during the scheduled times. To view your new Timed Menu now, Check the Active checkbox. You can go back and uncheck it later or wait for the schedule to do its thing.
Pro Tips!
You can change the State of a single timeframe to make it INACTIVE. The schedule will honor the other ACTIVE timeframes.
You can use the Menu Item Sorter to move your Happy Hour Unit Sizes to the top. This way, when the menu is Active, the happy hour priced items are at the top of the list in Arryved Service for easy ordering! Use the Sort Online Menus guide for Arryved Online and OpenTab menus.
Click on the Timed Menu from its Venue page, then click Duplicate Menu to copy the same menu with its schedule to any of your other Venues.
If you make changes to the schedule later on, you’ll have to make the same changes to the duplicates too (if you want those changes on all duplicartes).
Arryved Service
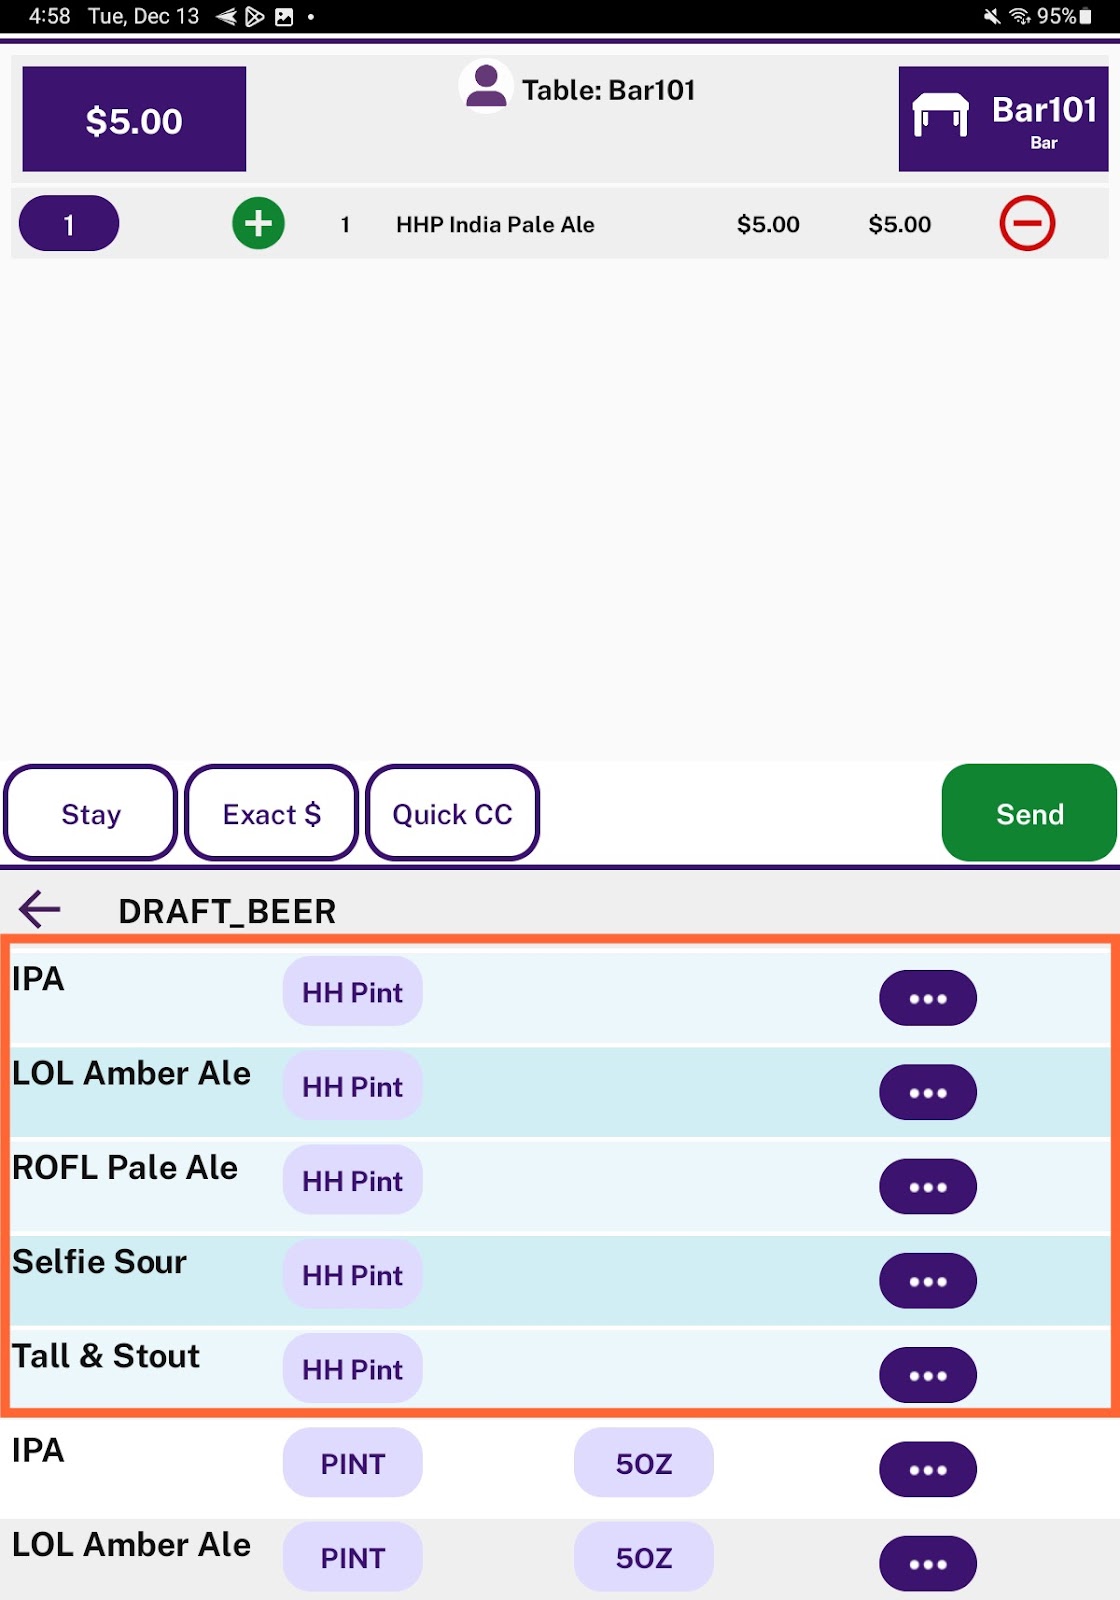
Here’s what a Timed Menu looks like in Arryved Service. Remember that the Timed Menu appears along with your normal menus. Since the normal menus are not on a timer, they don’t hide themselves.
You may see the same items twice when the Timed Menu is available. This is part of the reason for having separate Unit Sizes to differentiate.
Gut Check!
Let’s make sure you have everything configured correctly before leaving this guide.
Did you create separate Timed Unit Sizes (if needed)?
Did you add the new Unit Sizes to the Inventory Items on the Timed Menu?
Did you give the Timed Unit Sizes a Price and a Pricing Type other than Normal?
Did you create a new Timed Menu in a Venue and add the desired items to it?
Did you set the Pricing Type of the Timed Menu to match the Pricing Type of the Timed Unit Sizes on that menu?
Did you create a schedule for the Timed Menu?
Did you sort the Timed Menu items so they appear at the top of the list (Pro Tip)?
Did you duplicate the Timed Menu to the other Venus you want it in (Pro Tip)?
Related Articles
How To Sort Menu Items For Arryved Service
Related Articles
How To Create Menus
What Are Menus? Menus are curated in your Arryved Portal with the Inventory Items you want to offer your guests. You can create unique menus to offer in your different Venues or duplicate a master menu or two across your other Venues. The menus you ...OpenTab Schedule Troubleshooting
OpenTab Schedule Troubleshooting You may be changing your OpenTab schedule because your business hours have changed, you have an event taking place, or you want to enable OpenTab for a bit during off hours for testing or experimentation. If you are ...How To Create Venues
What Are Venues? Venues are the various revenue centers throughout your location. They can be anything from Bar, Restaurant, Taproom, Barrel Room, Patio, Gift Shop, Upstairs, Lounge, or anything that’s unique to your location. Your Venues are created ...How To Create Inventory Items
What is Inventory in the Arryved Portal? Anything you’d like to offer on your menus, such as food, drinks, and merch, will be added to your Arryved Portal as Inventory Items. Use this guide to learn how to create and customize your Inventory Items. ...OpenTab Setup Guide For Menu Viewing (Various Menus)
What Is OpenTab Digital Menu Viewing? OpenTab by Arryved empowers guests to self-order and/or view digital menus with QR code technology. OpenTab can omit the self-ordering feature and just be used for digital menu viewing if that’s what’s best for ...