Epson Printer Troubleshooting
Troubleshooting Your Epson Printer
Having issues with your Epson Printer? Try the following troubleshooting tips.
Prerequisites
First, consider your printer’s symptoms,
Is it just one printer or all of them?
If it’s just one printer, there must be an issue with that printer. If it’s all of them, the issue could stem from the network or the POS.
Is it not printing at all? Or is it printing the wrong items?
Printing the wrong things could be a printer configuration issue.
In Arryved Service, is there an X over the printer icon at the top? Or is there a red or yellow cloud?
X over the printer icon means there is a bad or no connection between the printer and the POS.
Red or Yellow cloud means the network is down or a POS device is in Offline Mode.
Have there been any recent network changes in your establishment?
Network changes could disrupt printer settings or configuration.
Limitations
Arryved Support is here to help with any of your POS or printer needs, but concerns related to your network or gateway (router) should be handled by your own Internet Service Provider or IT Specialist.
Troubleshooting Tips
The Easy Stuff
You’ll be surprised how often this does the trick.
Printer
Is the printer plugged in and turned on?
Try turning it off and back on.
Could it be out of paper or have a paper jam?
Is the WiFi dongle (USB Stick looking-thing) connected to the back of the printer? Make sure it isn't loose.
POS Device
Have you tried using a different POS device to send orders to the printer? This could indicate whether the issue comes from the device or the printer.
See if the POS device is connected to the correct POS WiFi.
Android Settings → Connections → WiFi.
Turn the POS Device off and back on.
Arryved Service
Swipe Kill
Close Arryved Service by swiping out of the app on the POS device (we call this a Swipe Kill).
To Swipe Kill, tap on the icon with the 3 vertical lines at the bottom of your POS screen. All of your open applications will appear in windows. Find the Arryved Service window, and swipe upward to make it disappear. This is how you close an app.
Wait a few seconds, reopen Arryved Service, and send a test print again.
Printer Settings
See if the correct printer is selected in Arryved Service from the POS device that’s taking orders.
Open Arryved Service.
Tap STAFF.
Tap Settings.
Under the Printers section, tap any of the ticket types to select a printer.
Double-check the printer settings look correct.
Tap Reset To Defaults if you want the printer settings on this device to match your default printer settings set up in your Arryved Portal.
Offline Mode
Did your POS device make its way into Offline Mode?
Open Arryved Service.
Tap STAFF.
Tap Settings.
Under the Offline Mode section, see if it’s toggled OFF or ON.
If toggled ON, switch to OFF.
Diagnostics
In Arryved Service, you can run a Diagnostics test that helps determine if the issue is coming from your network, gateway (router), POS, or printer.
Open Arryved Service.
Tap STAFF.
Tap Settings.
Tap Diagnostics.
Tap Run.
Read Diagnostics In Arryved Service to analyze the test results.
Arryved Portal
Default Printer Settings
See if your default printer settings are configured correctly in your Printer Matrix. This configuration applies to all POS devices unless settings are overridden for a specific device in Arryved Service. You must be an Arryved Portal Super Admin to check.
Head to your Arryved Portal.
From the left side navigation, click Location Settings.
Click Location Preferences.
Scroll to the bottom to find the Printer Matrix.
Read the Default Printers Setup Guide to familiarize yourself with printer configuration.
Review your Printer Matrix and see if any Peripherals (printers) look out of place.
Printer configuration is a complex subject, if you need assistance, feel free to contact the friendly voices at Arryved Support for help.
Merchant Peripherals
If your devices are on DHCP, meaning IP addresses are assigned randomly, IP addresses can change. See if the printer’s IP Address is correct in the Merchant Peripherals section of your Arryved Portal. First, you need to print a status sheet to see the printer’s current IP.
Turn the printer off.
From the bottom of the printer, find the pinhole labeled SW.
Find it next to the phone jack. It may be under the plastic or metal panel that’s easy to peel off.
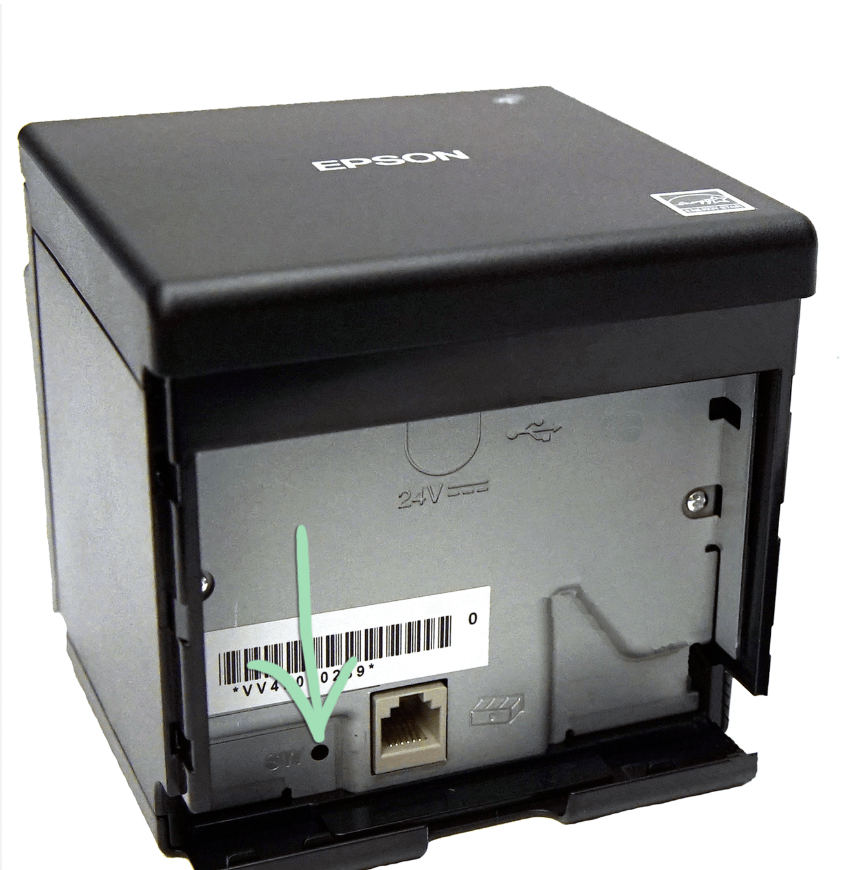
Use a pen, paperclip, or pointy object to press the button in the SW pinhole for about 3 seconds.
Wait for a sheet to print with the printer’s IP address.
Keep the sheet and head to your Arryved Portal.
From the left side navigation, click Devices.
Click Merchant Peripherals.
Click on the printer that you’re troubleshooting.
In the Device ID field, see if the IP address matches the one on the printed sheet.
If it doesn’t match, change the IP address to the one that’s printed on the sheet.
If you changed the IP, send another test print in Arryved Service. Close Arryved Service and reopen it first. See how to Swipe Kill above.
Advanced Troubleshooting
Network
First, test your device communication with a Ping Test to your printer and to your POS device. You’ll need the IP address for each to run the test.
If the printer Ping Test fails but the POS device succeeds, this likely means your Port 9100 is closed. Ask your IT Specialist to open it in the firewall for you.
If the printer Ping Test Succeeds but the POS device fails, this likely means your devices are on different networks. Make sure your POS device is connected to your POS network.
If both Ping Tests fail, it’s likely that you have Isolation Mode ON or Cross–Network Communication OFF in your router settings (both are the same, but different routers use different terminology).
Router
For these steps, you’ll need to log into your router settings from an internet browser. If you don’t know how to do so, contact your Internet Service Provider or IT specialist. Once in your router, check the following settings.
See if two or more devices have the same static IP address. Static IPs shouldn’t be repeated.
Set your Arryved POS devices to take priority over guest/other devices. Not all routers offer this, you may need to handle this with bandwidth instead.
Allocate a majority percentage of the bandwidth to the POS network segment. Throttle the remainder to the guest network (if you can’t prioritize certain devices).
All POS devices need to be on the same band. Either 5ghz or 2.4ghz are acceptable, but not both. Arryved recommends using 2.4ghz only.
Set the DHCP pool to .2-.200. Reserve higher static IP addresses for POS devices and printers.
Have Isolation Mode OFF or cross-network communication ON (however it's worded on your router). Leave the default if this has never been changed before, it will be correct.
Keep ping (ICMP echo/reply internal/external) available to allow a Ping Test to be run for diagnostics.
Printer Configuration
Maybe there’s an issue with how your printer was initially configured. Follow the steps in the Epson Printer Setup Guide (Wireless EpsonNet) to set up your printer correctly.
Arryved Support
Are you still having printer trouble after trying all the tips above? Contact our award-winning Arryved Support Team for assistance.
Urgent: (720) 310-0361
Non-urgent: support@arryved.com
If you believe issues are stemming from your network or router, please contact your own Internet Service Provider or IT Specialist for assistance.
Related Articles
Network Setup Guide 1: Introduction To Network Success
Network Setup Guide 2: Hardware Requirements
How To Run A Ping Test For Network & Device Communication
Epson Printer Setup Guide (Wireless EpsonNet)
Related Articles
Network Troubleshooting
WiFi Network Problems? Are you having trouble connecting an Arryved POS device to the internet? You may be having a network issue. Check the symptoms below and try some of the troubleshooting tips. Symptoms Do you see a Red Cloud icon on the top of ...Epson Printer Setup Guide (Ethernet)
Epson Printer Setup With Ethernet Have a brand new Epson printer you need to set up? Or are you trying to re-configuring your existing Epson printer? This article shows you how to configure your Epson printer using an Ethernet cable. Luckily, the ...Epson Printer Setup Guide (TM Utility)
Epson Printer Wireless Setup With TM Utility Have a brand new Epson printer you need to set up? Or are you trying to re-configuring your existing Epson printer? This article shows you how to wirelessly configure your Epson printer using the TM ...TM-M30III Printer Setup Guide (TM Utility)
Epson TM-M30III Wireless Printer Setup Have a brand new Epson TM-M30II printer you need to set up? Or are you trying to re-configuring the one you already have? This article shows you how to wirelessly configure in a few easy steps. Prerequisites ...DNS Troubleshooting
What Is DNS? The Domain Name System is the Internet's way of storing and managing its domain names. Think of it as the phone book of the internet. A Domain Name is a website's unique URL. For example, www.Arryved.com is a domain name that exists in ...