Default Peripheral Setup Guide
What Are Your Default Peripherals?
Your default peripherals refer to your basic ticket types. These are the Bar, Kitchen, and Receipt ticket types. Under the Location Preferences in your Arryved Portal, you’ll find the Peripheral Matrix where you can choose a Peripheral (printer or KDS device) for each Venue, under each ticket type. This article shows you how to configure your Peripheral Matrix for the three basic ticket types.
Prerequisites
Only an Arryved Portal Super Admin can complete the steps in this article.
Create your desired location Venues and Item Types in your Arryved Portal before proceeding. You can always add more or make adjustments later.
If you are allowing orders to come through from OpenTab or Arryved Online, you must have an Arryved Print Controller set up first.
Any physical printers or KDS screens you’re routing items to, need to be entered in the Merchant Peripherals page in Arryved Portal beforehand.
Limitations
You can only have one default Peripheral for each Venue in each ticket type on the Matrix. However, peripherals can be manually selected on a device in Arryved Service to override the default.
The health and success of your WiFi network are pertinent to the health and success of your Peripheral routing, including printing and KDS screen display. Please review the Network Setup Guide for a refresher on network success.
How It Works
There’s a lot of vocabulary involved in this process, here are some important terms.
Terminology
Merchant Peripherals
Your Merchant Peripherals include your printers or your KDS devices. They are entered under the Merchant Peripherals page in your Arryved Portal.
The Peripheral Matrix is used to route orders to your Peripherals based on the Item Category and the Venue they were ordered from.
Venues
Your Venues are the various revenue centers in your establishment. Venues are created and customized in your Arryved Portal and are unique to your business.
Employees working in one of your physical Venues will set their device to operate under that Venue in Arryved Service. Therefore, the system knows which Venue each order came from. Examples of Venues could be Bar, Dining Room, Patio, Barrel Room, Lounge, Upstairs, etc.
Item Categories
When you create a unique Item Type in your Arryved Portal, you’ll choose one of the preset Item Categories from the dropdown list that best represents the Item Type (see examples in the image below). Inventory Items are then assigned an Item Type with the associated Category.
The Item Categories determine which ticket type the Inventory Items under that Item Type are sent to. Each Item Category is linked to either the Bar or Kitchen ticket types in the Matrix or is set to No Print.
Default Peripherals
Your default peripherals refer to your Bar, Kitchen, and Receipt ticket types. Each Item Category is linked to either the Bar or Kitchen ticket types or set to No Print. When you configure these ticket types, the configuration becomes your default. You can change from the. default settings to a custom set up on any individual device in Arryved Service.
Configuring Your Default Peripherals
Remember, your Peripherals are your printers and KDS devices. You can have more than one peripheral under each ticket type in the Matrix, but only one per Venue in each ticket type.
For example, if you have two bars in your establishment with their own peripherals, you still only need to operate under the Bar ticket type in the Matrix as long as the two bars are their own Venues.
Head to your Arryved Portal as a Super Admin.
Click on Location Settings.
Click on Location Preferences.
Scroll to the bottom, and find the Peripheral Matrix.
For each default peripherals type, choose a Peripheral under each Venue. Read the guidelines below for a detailed explanation.
Default Peripheral Type
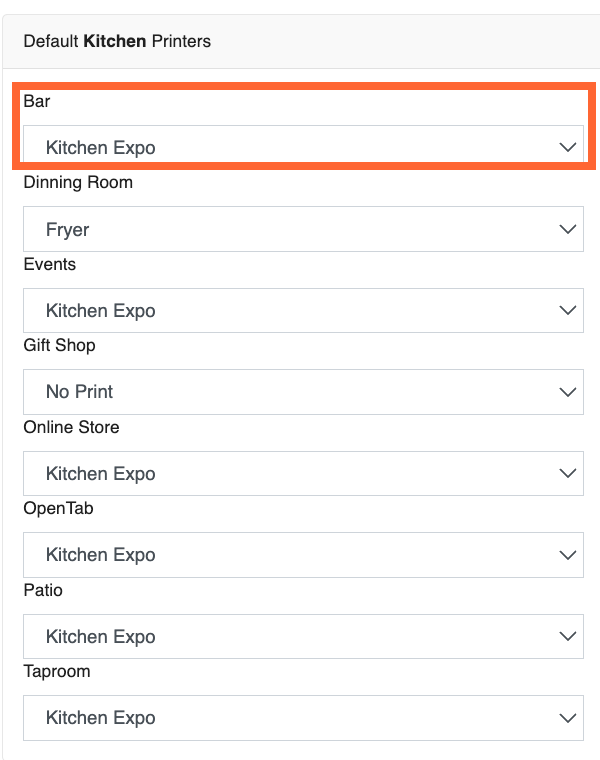
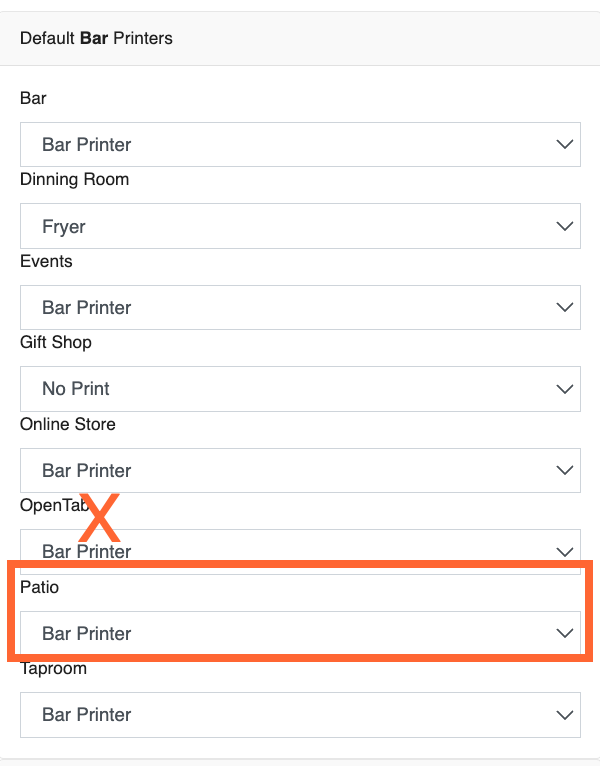
Kitchen, Bar, and Receipt are the default ticket types used for basic configuration.
Bar
Any Item Types that have the following Item Categories assigned to them will print or display to your bar Peripheral(s) by default.
Bar Item Categories: BEER, BEER COCKTAIL, BEVERAGE, COCKTAIL, DRAFT BEER, DRAFT CIDER, DRAFT COCKTAIL, DRAFT GUEST BEER, DRAFT MEAD, LIQUOR, MEAD, NA BEVERAGE, SELTZER, WINE.
Kitchen
Any Item Types that have the following Item Categories assigned to them will print or display to your kitchen Peripheral(s) by default.
Kitchen Item Categories: FOOD, OTHER FOOD.
Receipt
All other printed material that is not a prep ticket will print under the Receipt printers, including guest-facing receipts and closeout slips.
In addition, all other Item Categories not linked to the Bar or Kitchen ticket types are linked to the receipt printers when the orders are coming from your Arryved Online Store. Otherwise, those Item Categories are set to No Print.
If you’d like all Item Categories that are set to NO PRINT to actually print, reach out to Arryved Support and they can make that happen for you.
Venue
Your location’s Venues are listed under each of the ticket types in the Matrix. If you only have one Venue for your entire location, you’ll see only one Venue there. In the example in the image above, there are seven Venues.
Merchant Peripheral
Under each Venue in the ticket types is a dropdown list with all of your Peripherals. Select a peripheral for each Venue under each ticket type.
Here’s an example of how the routing works, in the image below, all Item Types with the FOOD or OTHER FOOD Item Category that are ordered from the Bar Venue will print to the Peripheral named “Kitchen Expo.”
Printer Override
Printer Override can be used to override the default Peripheral Matrix for an individual Inventory Item. You can choose to send that specific item to a different ticket type other than the one defined by its Item Category.
Arryved Service
You can also override specific Peripherals in a Venue from a single POS device in Arryved Service. The HARDWARE Labor Role Permission is required to complete this task.
Open Arryved Service and log in.
Tap the Venue toggle on the top left corner and choose a Venue.
Tap STAFF.
Tap Settings.
Under the Printers section, you’ll see a list of your ticket types as buttons and next to each ticket type is the Peripheral set for it under this Venue. Tap on a ticket type to change the Peripheral selection.
This change only affects orders taken from this specific POS device and in that specific Venue.
It also only affects orders placed through Arryved Service, not Arryved Online or OpenTab.
If you tap Reset Defaults, these printer settings will default back to what is set in the Peripheral Matrix in your Arryved Portal.
Note: Any time you make changes to the Peripheral Matrix in Arryved Portal, you will need to tap Reset to Defaults on any devices you want to reflect that change.
Arryved Online And OpenTab
When it comes to order routing from Arryved Online or OpenTab, there are a few extra things to know.
A separate device with Arryved Print Controller is required to use Arryved Online or OpenTab.
Orders may experience up to a 1-minute delay before printing or appearing on a KDS screen.
Default peripheral settings for Arryved Online and OpenTab can’t be overridden in Arryved Service, they always honor what’s configured in the Arryved Portal Peripheral Matrix.
If you need to make any adjustments, reach out to Arryved Support, they can make the magic happen.
Arryved Online Only
Item Categories that are set to (No Print) are generally not sent to a ticket type, except when ordered from Arryved Online. Online orders with No Print Item Categories will print to the receipt ticket type under your Arryved Online Venue.

Think about someone buying a T-shirt in your gift shop. The T-shirt sale doesn’t need a printed ticket because the staff member can just hand over the merchandise. However, if a guest orders a T-shirt online, you’ll likely need a ticket to prepare the order for the guest who isn’t physically on premise at the time.
OpenTab Only
If you’re using OpenTab, you’ll have an “OpenTab” Venue (it could be named something else). This is not a physical Venue, it’s simply created to use for OpenTab configuration. Some or all of your regular on-premise Venues will have OpenTab QR codes in them. Orders placed through OpenTab will route to the Peripheral that is selected for the on-premise Venue where the QR code lives. In the default Peripheral Matrix, choosing a Peripheral under the OpenTab Venue won’t do anything.
For example, if a guest places a drink order through an OpenTab QR code from your Patio Venue, the order will be sent to the Peripheral selected under the Bar ticket type in for the Patio Venue, not the OpenTab Venue.
Next
Give your Peripheral Matrix a good once-over to ensure the Peripheral routing for each Venue under each ticket type is to your liking. Now, place a few test orders from your different Venues in Arryved Service to see if they print or display properly. Send a few orders through OpenTab and Arryved Online too if you have those in place.
Related Articles
Expanded Peripheral Setup Guide
What Are Your Expanded Peripherals? To start, you have access to the three basic ticket types Bar, Kitchen, and Receipt. Your Printers or KDS screens are linked to your ticket types using the Peripheral Matrix in your Arryved Portal. For ...Epson Printer Setup Guide (Ethernet)
Epson Printer Setup With Ethernet Have a brand new Epson printer you need to set up? Or are you trying to re-configuring your existing Epson printer? This article shows you how to configure your Epson printer using an Ethernet cable. Luckily, the ...Epson Printer Setup Guide (TM Utility)
Epson Printer Wireless Setup With TM Utility Have a brand new Epson printer you need to set up? Or are you trying to re-configuring your existing Epson printer? This article shows you how to wirelessly configure your Epson printer using the TM ...How To Use Printer Override
What Is Printer Override? Your Printers or KDS screens (a.k.a. your Peripherals) are defined by various ticket types. For your default ticket types; Bar, Kitchen, and Receipt, Printer Override sends a specific inventory Item to a different ticket ...ORDER Screen Overview
What Is The ORDER Screen? The ORDER Screen is an advanced feature for Arryved Service that can be enabled for any of your Venues. When enabled, a new screen option is added to the top navigation bar in Arryved Service, when working under that Venue. ...