Printer Diagnostics In Arryved Service
What Are Printer Diagnostics?
Sometimes, printers change IP addresses, which may lead to print failures. Luckily, Arryved has a new tool to resolve this issue right away. Use the Printer Diagnostics button on the STAFF screen in Arryved Service to sync the new IP address with your Arryved Portal and get your printer working again in a flash! Read this guide to learn how to use the Printer Diagnostics tool.
Prerequisites
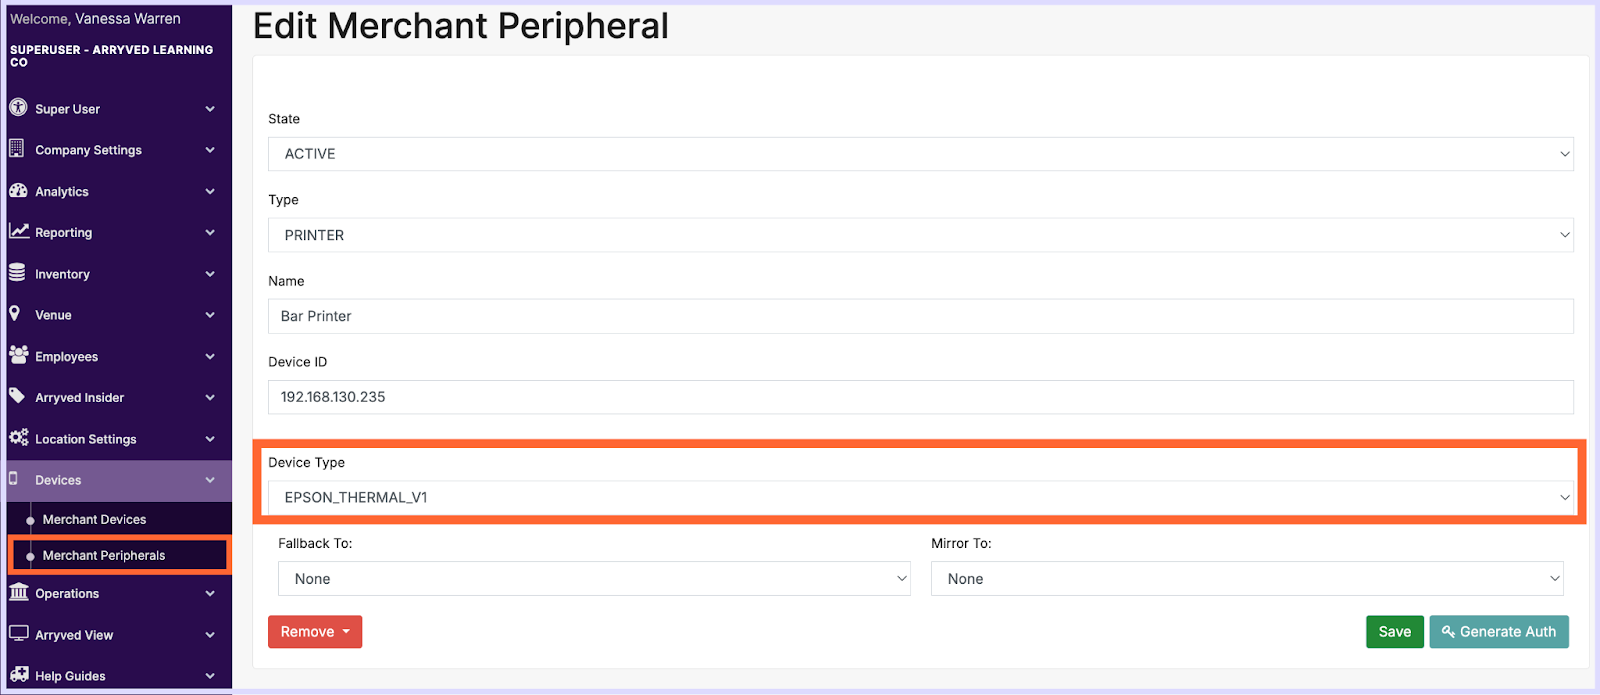
The Printer Diagnostics tool will only work for printers that have been added to the Merchant Peripherals page in your Arryved Portal.
Limitations
When using this tool for printer mapping, be careful not to select the wrong Merchant Peripheral for a given printer. This could lead to wonky print behavior, such as bar tickets being sent to the kitchen, for example. Double-check the IP address by printing a fresh chit sheet during this step.
Tapping buttons too quickly may lead to an error in the printer mapping. If it’s telling you that you still need to map a printer that you swear you just mapped, close the tool and re-open it to resolve this.
How It Works
The Printer Diagnostics tool is designed to help you sync a printer’s new IP address with its Merchant Peripheral in your Arryved Portal so printing can continue successfully.
It achieves this by recognizing the MAC address instead of the IP. For this to work, you need to initially map your printers to the corresponding Merchant Peripherals so that when IP addresses change in the future, the system has a way to recognize them (via MAC address).
Initial Printer Mapping
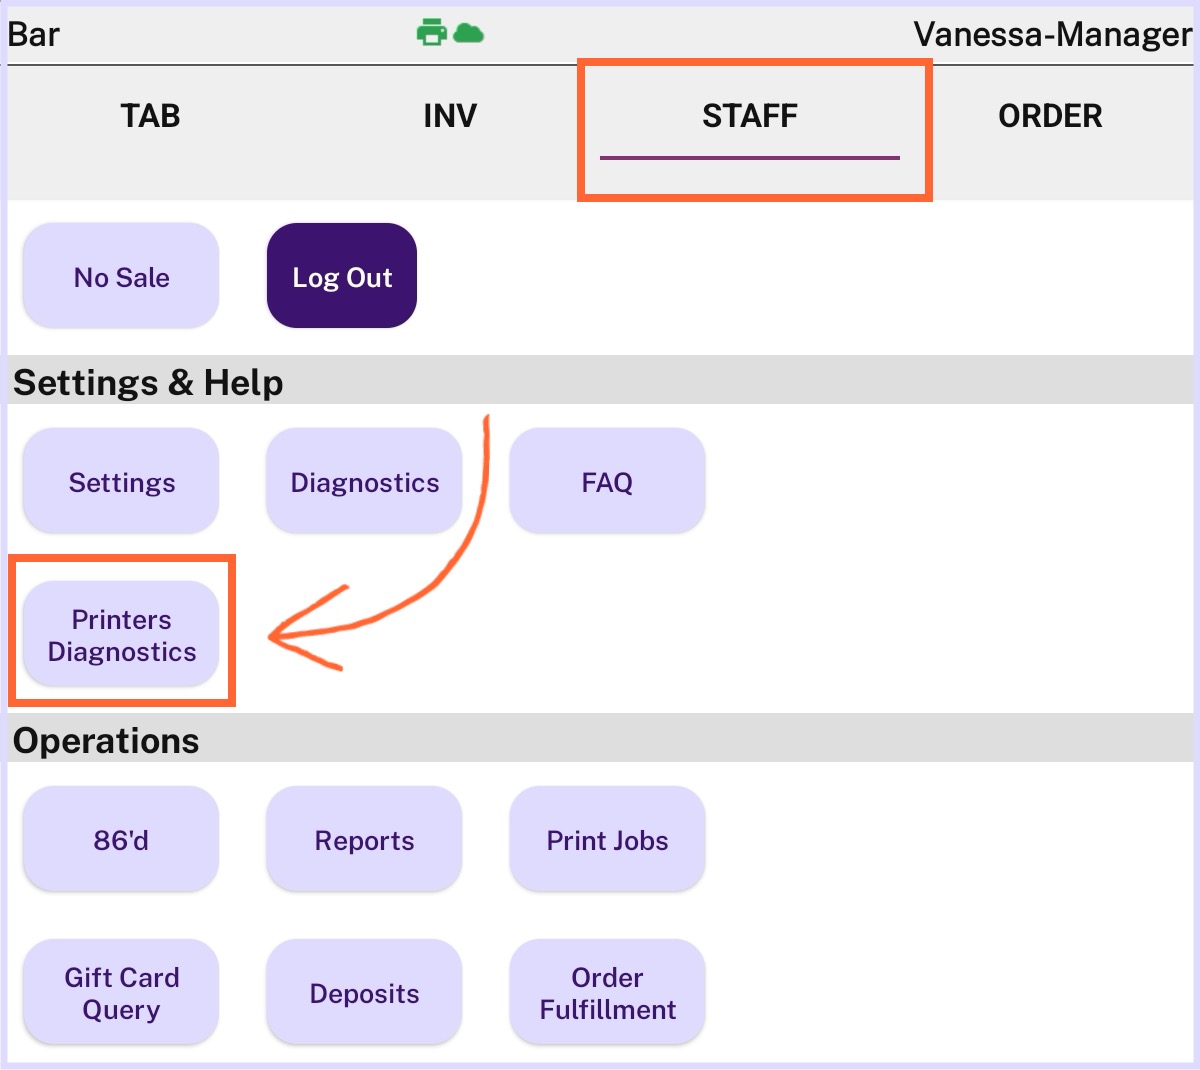
Log in to Arryved Service.
Toggle to the STAFF screen.
Tap Printer Diagnostics.
If it’s your first time using this tool, you’ll need to map your printers with their corresponding Merchant Peripheral entered in your Arryved Portal. The tool will do a scan of any EPSON device found on your POS network (the WiFi your POS devices use).
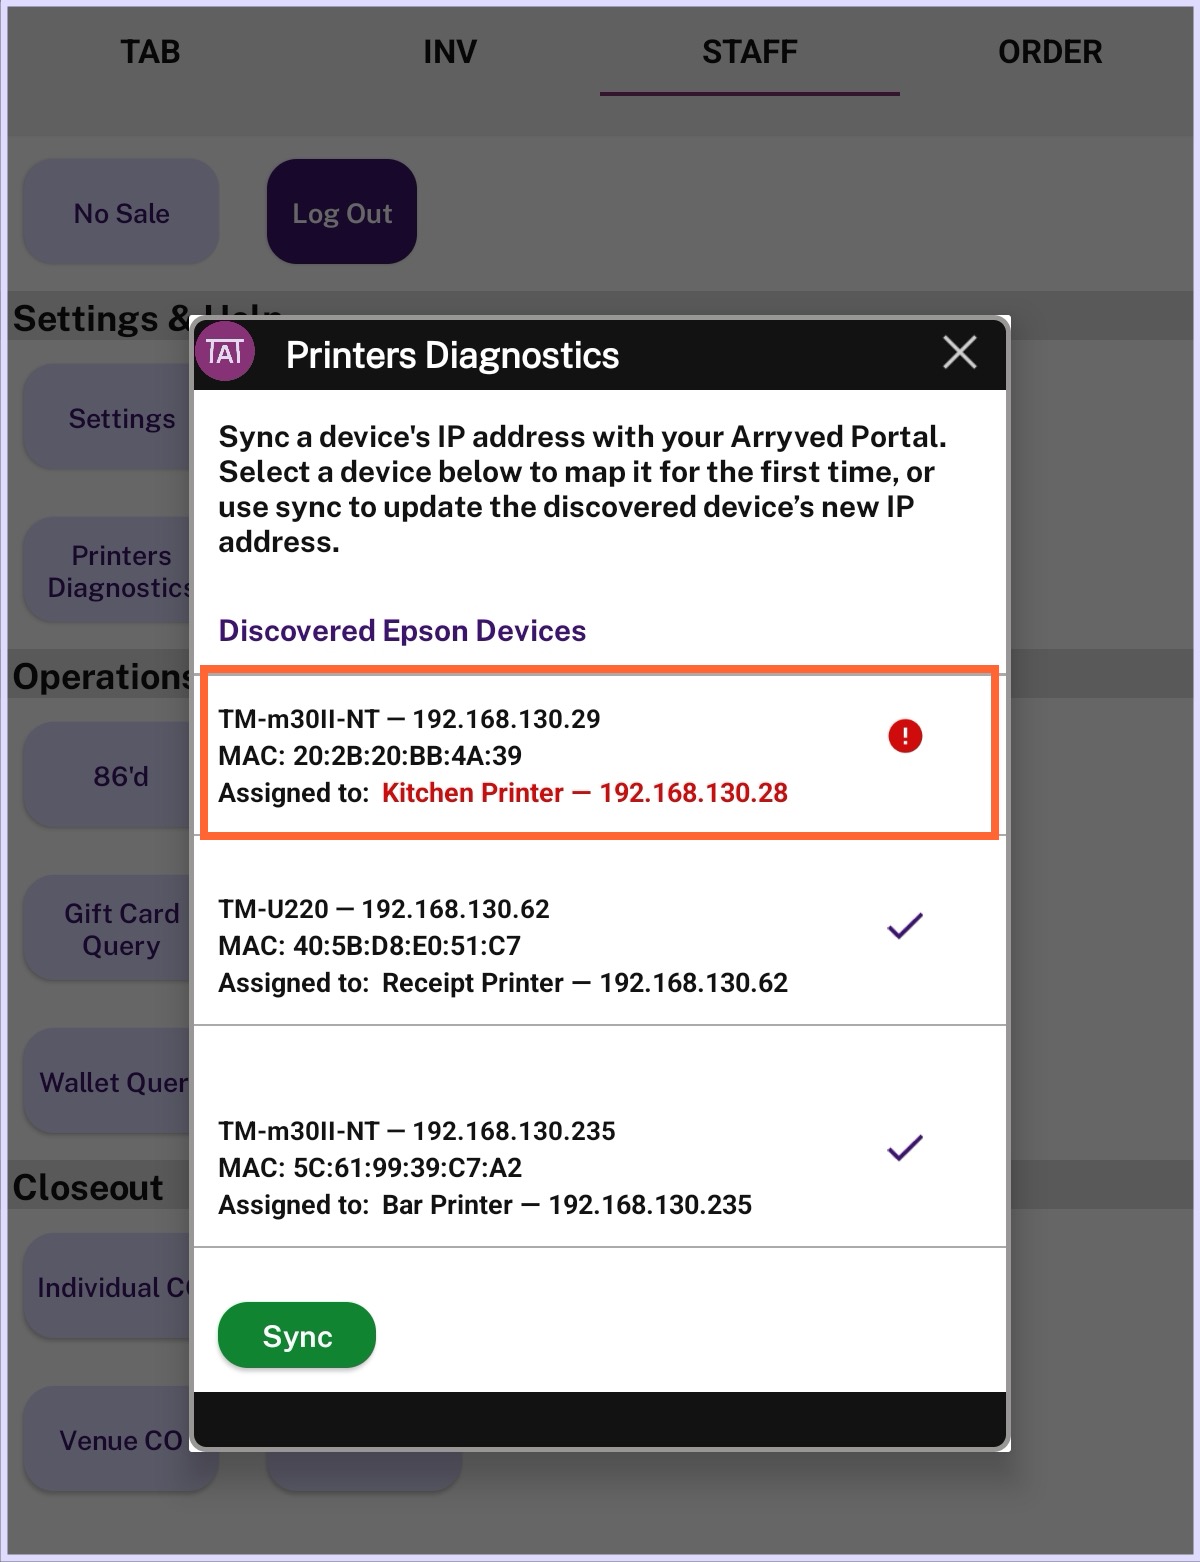
The yellow triangle icon signifies a device that is yet to be mapped.
Devices will display the type of device, the current IP address, and the MAC address.
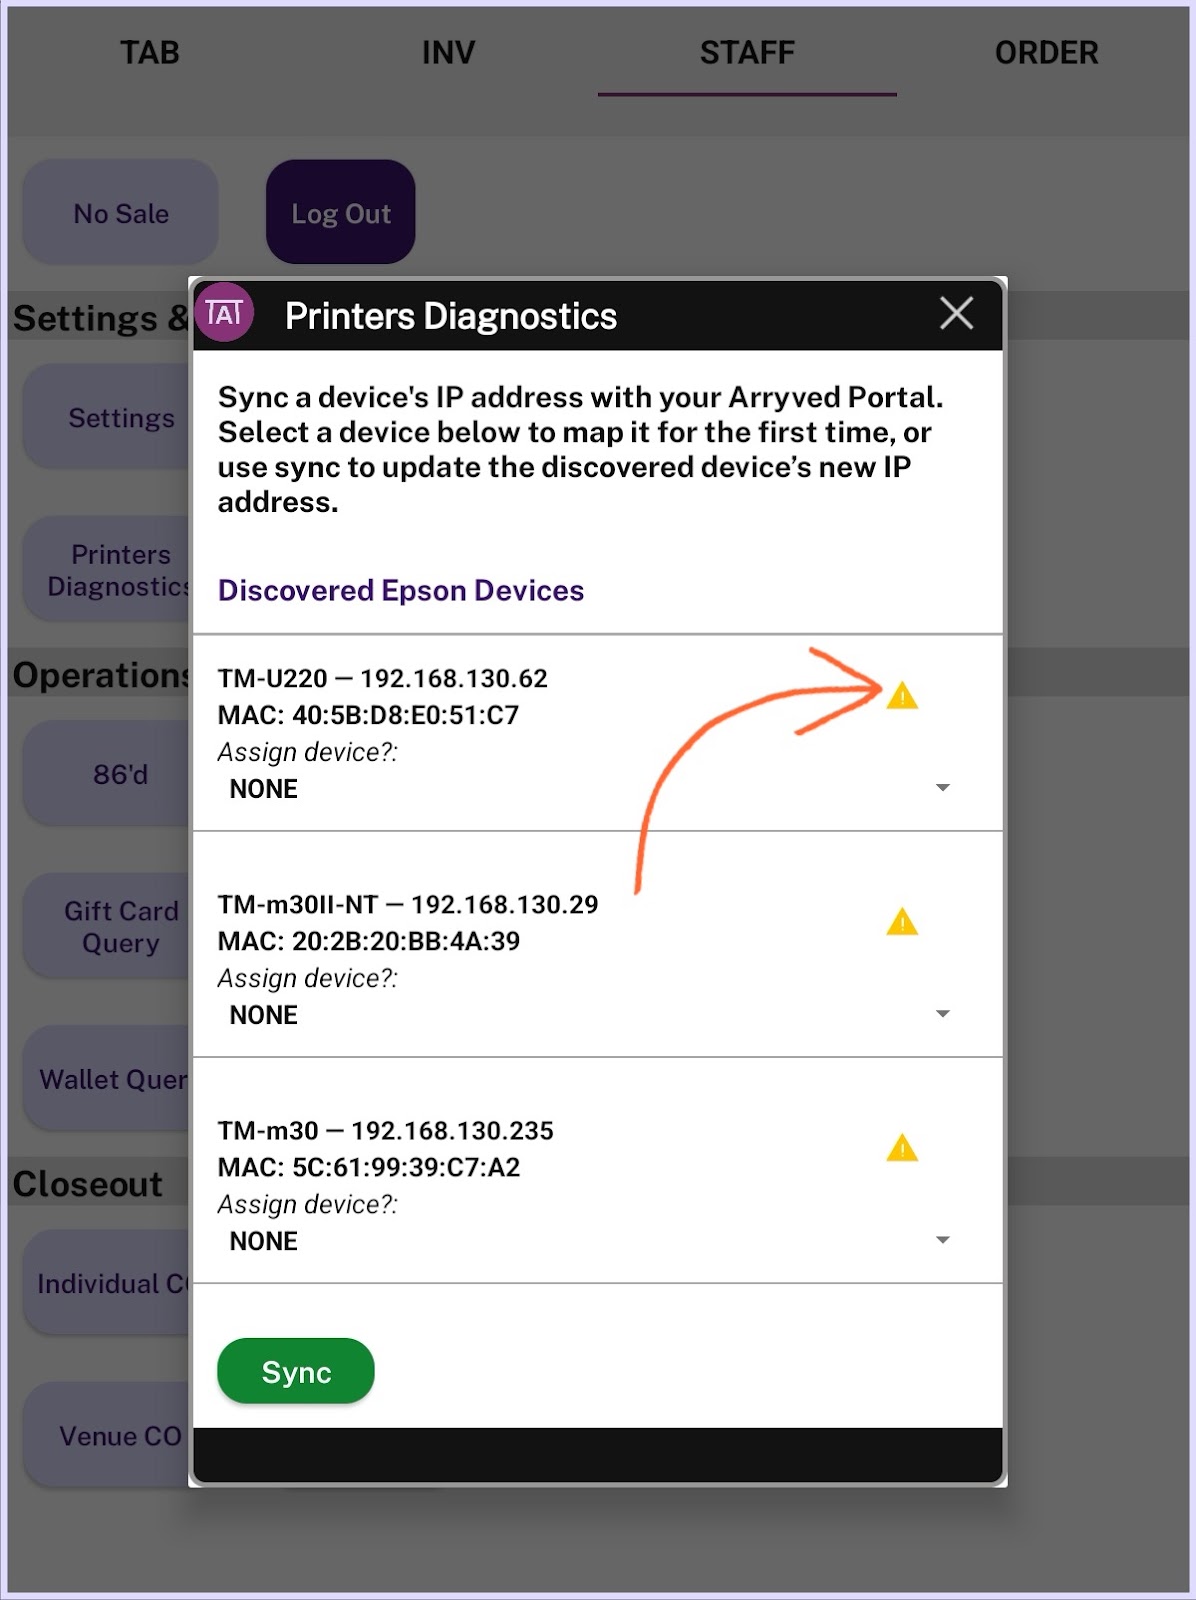
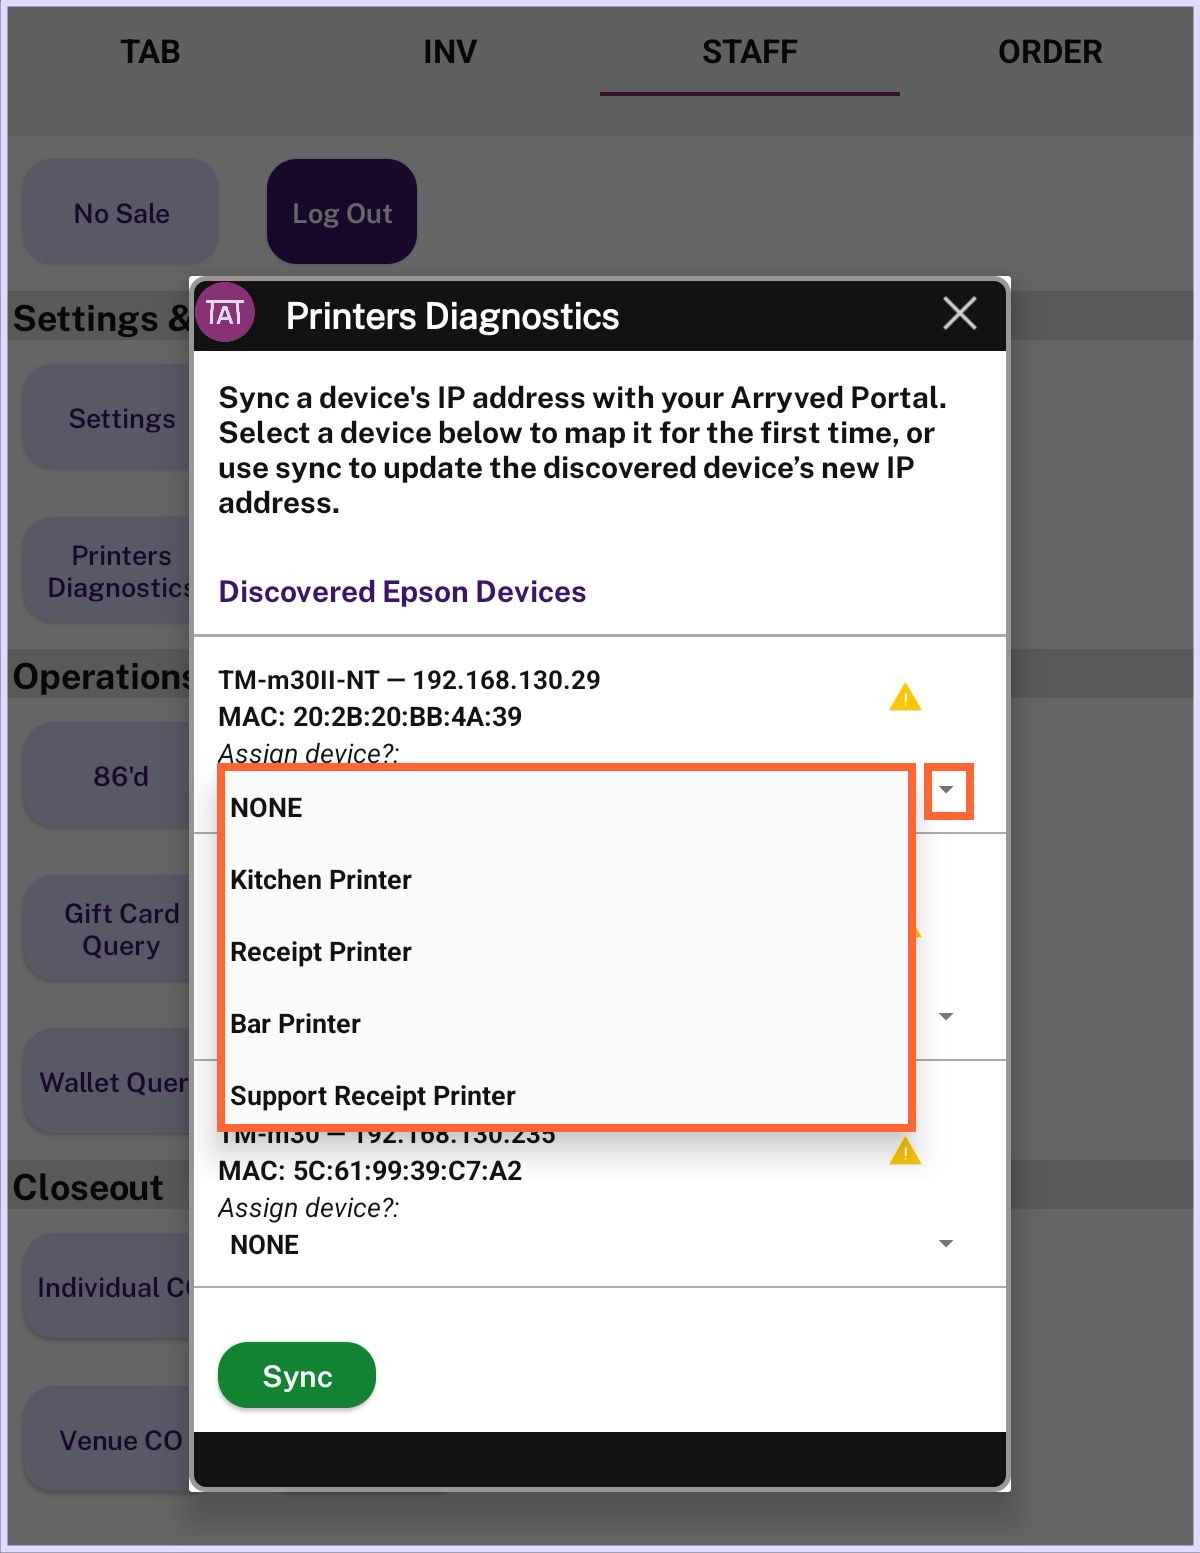
Under Assign Device?, tap ‘NONE’ or the down arrow to expand the dropdown options.
This list pulls up all of your Merchant Peripherals with either EPSON_IMPACT_V1 or EPSON_THERMAL_V1 selected as the Device Type. No other device types are included in the list.
Select the Merchant Peripheral (by name) that corresponds to this printer.
If you’re unsure which printer is which on the Printer Diagnostics screen, print a fresh chit sheet to see the IP address (use a pointy object to press into the SW pinhole on the back of the printer. Press for 3 seconds until a sheet prints).
Once something is selected, the yellow triangle icon will change to a checkmark.
For any EPSON devices found that are not an IMPACT or THERMAL printer, you can ignore them and leave the default at ‘NONE’.
Once all applicable printers are mapped, tap Sync.
You only need to do this initial mapping once, and the system will remember which MAC addresses were assigned to which Merchant Peripherals. That way, if a printer’s IP address changes, you can send the new IP to the correct Merchant Peripheral from this screen.
If you introduce new printers to your operations in the future, you will need to map them here.
Be extremely careful not to accidentally map a printer to the wrong Merchant Peripheral. This will update the IP in your Portal, and you may experience tickets or receipts printing to the wrong printer. If this happens, you will need to delete the Merchant Peripheral and re-enter it to start over. Contact Arryved Support to help if needed.
Syncing New IP Addresses
If you’re experiencing a printing failure, the printer’s IP address may have changed (it happens) and is no longer synced with its Merchant Peripheral in your Arryved Portal and therefore can’t print.
If this printer has been mapped, you can use the Printer Diagnostics tool to resolve this issue in just a few seconds!
On the STAFF screen in Arryved Service, tap Printer Diagnostics.
This time, an unrecognized IP address will display a red circle icon.
Tap Sync, and it will push the new IP address to your Arryved Portal.
Luckily, the tool has the MAC address saved and knows which Merchant Peripheral it was assigned to. No need to run to a computer to make this change! Yay!
Send a test print to that printer to see if that resolved your printing issue!
Troubleshooting
If you accidentally mapped a printer to the wrong Merchant Peripheral, here are the steps to reverse it:
Make sure the printer is not ‘in use’. You may need to remove it from the Printer Matrix in the Location Preferences of your Arryved Portal and/or deselect it from STAFF > Settings in Arryved Service.
Delete the Merchant Peripheral that was incorrectly assigned.
Re-add the Merchant Peripheral.
Revalidate your POS device.
Remap it in the Printer Diagnostics tool.
Feel free to contact Arryved Support if you get stuck.
Related Articles
Default Peripheral Setup Guide
Expanded Peripheral Setup Guide
Related Articles
Epson Printer Troubleshooting
Troubleshooting Your Epson Printer Having issues with your Epson Printer? Try the following troubleshooting tips. Prerequisites First, consider your printer’s symptoms, Is it just one printer or all of them? If it’s just one printer, there must be an ...Epson Printer Setup Guide (TM Utility)
Epson Printer Wireless Setup With TM Utility Have a brand new Epson printer you need to set up? Or are you trying to re-configuring your existing Epson printer? This article shows you how to wirelessly configure your Epson printer using the TM ...Diagnostics In Arryved Service
What Are Diagnostics? If you notice something is wrong and don’t know what’s causing the problem, running a diagnostic test in Arryved Service can help find the issue. Prerequisites Read Introduction To Network Success to learn about network health ...Arryved Service Troubleshooting
Troubleshooting In Arryved Service I’m sure someone somewhere has asked you, “Have you tried turning it off and on again?” Sometimes, it’s that simple. There are a few tricks up the Arryved Service sleeve to get you back in business when you just ...How To Set Up Arryved Service For The First Time
What Is Arryved Service? Arryved Service is your main Point-Of-Sale center downloaded and installed on each of your POS devices. Employees clock in or log in to Arryved Service to place orders, manage tabs, and track their hours worked. There are ...