STAFF Screen Overview
What Is The STAFF Screen In Arryved Service?
In Arryved Service, there are three default screens you can toggle between. The TAB, INV, and STAFF screens. The STAFF screen is where you’ll find the Arryved Service settings and many managerial tools to help you run a smooth operation. This article shows you what’s offered on the STAFF Screen with additional links to reading material that detail each function.
Prerequisites
Certain tools in this article require various Labor Role Permissions to access.
The STAFF screen is tailored to your unique business needs. Not all tools in the STAFF screen mentioned in this article are available by default. Some are made available based on your Location Preferences set in your Arryved Portal.
Limitations
Quick Reports in Arryved Service only show data for same-day operations.
How It Works
Open Arryved Service and log in.
From the top navigation bar, tap STAFF.
Depending on the Location Preferences configured in your Arryved Portal and the Labor Role Permissions you have when logged into Arryved Service, you could see many variations of the STAFF screen. The image below shows all possible buttons on the STAFF screen. We’ll explain how they function and how they can be visible to you.

No Sale & Log Out
The No Sale and Log Out buttons live at the top of the STAFF screen.
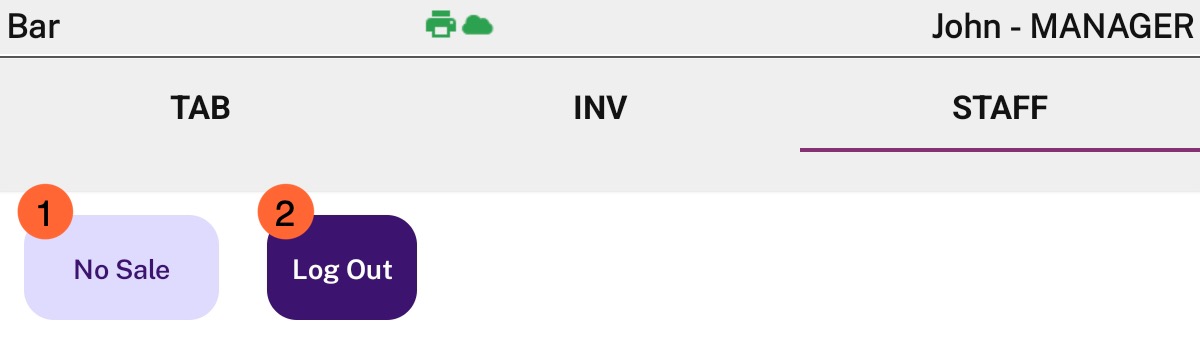
No Sale
The No Sale button is only visible if you have a cash drawer selected for this device. Tap the No Sale button to pop open the cash drawer so you can access the goods inside!
Select a Cash Drawer in Arryved Service under STAFF → Settings → Drawer. You need the HARDWARE Labor Role Permission to do so.
Log Out
Tap the Log Out button for a quick log-out. You’ll be taken back to the clock-in/log-in screen.
This button is available by default and doesn’t require any Permissions.
Settings & Help
The next section houses the Arryved Service settings and help tools. These buttons are available by default and don’t require any Permissions.

Settings
All settings related to Arryved Service live here. Certain settings may be hidden based on Labor Role Permissions. Read Arryved Service Settings for more information about each one. Here you’ll find settings for,
Venue selection
Card Reader pairing
Barcode Scanner pairing
Printers (or KDS screens) selection
Offline Mode
Cash Drawer pairing
Troubleshooting tools.
Arryved Support, network, and device information.
Diagnostics
Tap the Diagnostics button to run a network connection test. Here you can also find important device and network information including the device name and IP address. Read more about Diagnostics In Arryved Service.
FAQ
Behind the FAQ button is a list of frequently asked questions with quick answers for your convenience. There are also links to our popular Knowledge Base articles you can read right from your POS device!
Operations
The next section down on the STAFF screen houses your tools for your daily operations.

86’d
Tap the 86’d button to see a list of Kicked items. Read more about How To Manage Inventory In Arryved Service.
No Permissions are needed to view the list, but the EIGHTY SIX Labor Role Permission will enable the “Avail” buttons next to each item.
Tap Avail to place the item back in stock so it can be ordered!
Reports
Under the Reports button live your Quick Reports including various reports for Sales & Labor, Tabs, and your shift closeout.
The REPORTS Labor Role Permission is needed to see the Reports button on the STAFF screen.
Some reports within the Reports button are only visible with the additional MGR REPORTS Labor Role Permission.
Some reports are only available by Location Preference.
Print Jobs
This Print Jobs button is not in function at this time.
Gift Card Query
Tap the Gift Card Query button to view the balance on a gift card. You can swipe the gift card through your card reader or tap the three vertical dots to access manual entry.
This button is available by default and doesn’t require any Permissions.
Deposits
Tap the Deposits button to see a list of deposits yet to be returned. Each line in the list shows the deposit information including the tab details, the deposit name(s), quantities, and the price.
You can tap the Return button next to each deposit to mark it returned and remove it from this list. You’ll be taken to the order screen to complete the return.
This button is available by default and doesn’t require any Permissions.
Read more about How To Sell And Return Deposit Items In Arryved Service.
Order Fulfillment
The Order Fulfillment feature is a great tool if you’re using Arryved Online. It tracks your online orders and you can mark them delivered. Read more about the Online Order Fulfillment Screen.
Reach out to Arryved Support to enable this button for you in Arryved Service.
Cash Actions
Cash Actions is a tool used for various cash handling actions such as drawer management and employee tipouts.
Please reach out to your Implementation Manager or Arryved Support to enable Cash Actions. This is not available by default.
Learn more about Cash Actions.
Closeout
The bottom section of the STAFF screen houses your closeout tools.
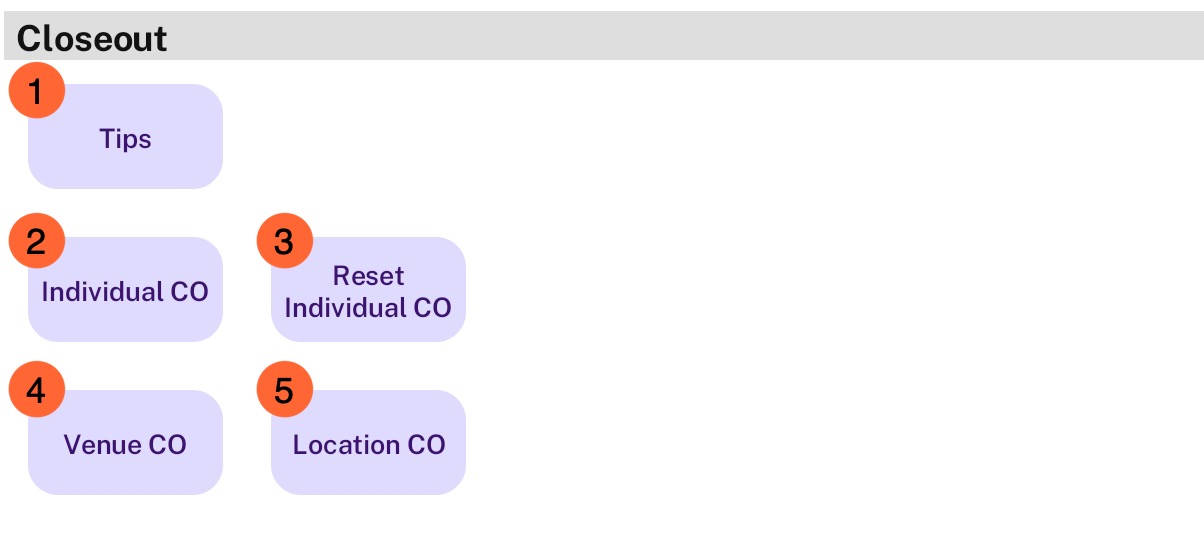
Tips
The Tips button is visible if Cash Actions or Forced Tip Claim is enabled for your location. It shows a list of all closed tabs with payment details and the ability to adjust the tip. From this screen, employees can enter their tip claim at the end of their shift or enter a cash-back amount.
Read about the Tips button in the Cash Actions Overview article.
Individual CO
The Individual CO is a closeout report that shows a breakdown of sales totals for the shift from the employee who printed the report. Read the Individual Closeout Overview and Information On The Closeout Reports. There are many uses for this report including,
Helping with your cash bank count and closing out the day of sales.
For individual employee tip-outs if your business doesn’t do tip pooling.
To manage a cash drawer closeout.
Manually enter cash tips into their respective tabs or make adjustments to credit card tips.
This button is available by default and doesn’t require any Permissions, but is advised not to use it if your location uses Cash Actions.
Reset Individual CO
Tap the Reset Individual CO button to restore the employee’s tabs if the Close-out button was hit by mistake under the Individual CO button.
This button is available by default and doesn’t require any Permissions
Venue CO
The Venue CO is a closeout report that shows a breakdown of sales totals from the Venue that your device is currently set to. Read the Venue Closeout Overview.
You can use this report to help with your nightly drawer count and close out the day of sales.
This report is helpful for businesses who want to manage separate cash banks for each of their Venues within their location.
The REPORTS Labor Role Permission is required to view this button in Arryved Service.
Location CO
The Location CO is a closeout report that shows a breakdown of sales totals for your entire location up to the time the report was printed. All Venues are combined in this report. Read the Location Closeout Overview.
You can use this report to help with your nightly drawer count to close out the day of sales.
This type of closeout is useful for businesses managing one bank, even if one bank includes multiple cash drawers.
The REPORTS Labor Role Permission is required to view this button in Arryved Service.
Related Articles
Order Fulfillment Screen Overview
What Is The Order Fulfillment Screen? The Order Fulfillment Screen is an advanced feature for Arryved Service used to help manage and fulfill orders coming in from your Arryved Online Store. When enabled, the Order Fulfillment button is added to the ...Gift Cards Overview
Gift Cards At Arryved Gift cards are great for gift-giving and keeping a smile on those friendly faces that frequent your establishment! If gift cards are a must-have for your business, Arryved can help. This article tells you everything you need to ...Quick Close Overview
What Is Quick Close? A quick close is a one-time transaction. Your guest is placing an order or making a purchase and closing out right away. For any of your Venues, you can enable Quick Close buttons for the order screen in Arryved Service to make ...How To Enter Gift Card Prefixes
What Are Gift Card Prefixes? Oftentimes a set of gift card numbers will each begin with the same long string of numbers. This is known as the prefix. You can set up gift card prefixes, so in the event you need to manually enter a gift card number in ...Daily Item Size - Quick Report Overview
What Is The Daily Item Size Report? The Daily Item Size report is one of the Quick Reports available in Arryved Service. This report shows the quantity of each item sold by their individual Unit Sizes. The report is useful for seeing if you may need ...